

I’m starting to twitch. That usually happens if it’s been longer than couple weeks without a blog post. Can you tell it’s been a bit crazy over here? I’ve had this draft open for over two weeks on my computer. As much as I don’t like being away from blogging, it’s refreshing to step back now and then. I’m really enjoying soaking up as much time with Adriana as I can. The weeks are flying by and it’s bittersweet when I think about how fast she’s growing. The second cookbook is also coming together really well. I’m so encouraged by how well the recipe development is going this time around! The recipes are turning out eyeball popping delicious. I’m so proud of each and every recipe that’s going into this book and I can’t wait for you to enjoy them with your loved ones!
Before I forget, I want to update you on my call for recipe testers. I know some of you assumed that you weren’t selected, but I actually haven’t contacted anyone yet as I’m running behind. I’m sorry for the delay; things tend to move at a glacial pace with a baby around! hah. It reminds me of one of my favourite quotes from the movie Devil Wears Prada: “By all means, move at a glacial pace…you know how that thrills me.” Oh Meryl, I love you. Anyway, I hope to send out email invites within the next month. We had a huge amount of volunteers – about 10,000 of you – crazy, right? Your enthusiasm is amazing. I will only be able to invite about 40 or 50 to start off with – I wish I could take you all up on your generous offer to help. Thank you all again so much!
If you’d like to see some cookbook teasers and what I’m up to behind the scenes, be sure to check out my Instagram account – I created a new hashtag called #osgcookbook2 where I will be sharing recipe teasers for the next several months.
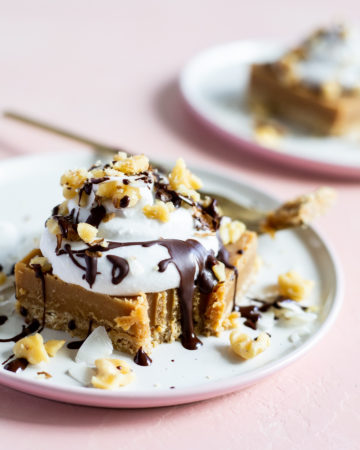
OK, now onto this recipe! I’ve been working on the dessert chapter for my cookbook. One thing you told me loud and clear about the first book is that you want more desserts (especially cookies). And you know what? I totally agree! So for this next book, I’ve created a bigger, more awesome dessert chapter. It’s gonna blow ya mind…trust me on this one. I decided these nut-free dream cups were just too good to hold onto. This recipe is inspired by one of the most popular recipes from 2013 – my Raw Almond Butter Cups. Many of you asked for an almond-free version so I made it nut-free and added a third layer for fun. While I love the almond butter cup recipe, these are my new favourite for sure. The snappy coconut butter base provides a great contrast to the creamy middle and chocolate topping.
I have recently fallen back in love with coconut butter during my recipe testing pursuits. It’s so darn easy to make at home (the first time I made it at home was back in 2010). Have you made it before? It’s pretty life-changing. The store-bought stuff is super expensive for some reason (why are those jars soooo much?), but making it at home is really cheap! I use a 400 gram bag of No Name unsweetened medium coconut (see below). You want to be sure you are using unsweetened shredded coconut and not flaked, sweetened, or low-fat kinds. Ontario folks, you can find this No Name bag at Fortinos and I’m guessing other grocers too. I find some shredded coconut to be hit or miss when making homemade coconut butter, but this bag works perfectly every single time! I’ve also found processing 3-4 cups at a time works best – anything less and it might not break down into butter. Also, make sure the coconut you are using is fresh – if the coconut is stale it most likely won’t turn into butter. The beauty is that the leftover coconut butter will keep for a very long time in the fridge or pantry and you’ll always have some handy for baking.


It’s such a treat to eat a spoonful of this warm homemade coconut butter!
To start off with, I added a scant teaspoon of coconut butter into each mini silicone mold. This is the one I use. They pop out so easily! I love using it for making homemade chocolate too. You can probably also use mini (or standard size if that’s all you have) cupcake paper liners.

Pop those in the freezer while you stir together the filling.

I made a very easy homemade chocolate for the topping using unsweetened cocoa powder, maple syrup, and coconut oil. All topped with large coconut flakes for a crunchy texture. Easily one of my favourite quick and easy desserts to come out of my kitchen in a while!


Featuring all new, protein-packed salads, hearty toppers, flavour boosters, and dressings you'll want to drink, my new cookbook will transform the way you think about salads. Oh, and be sure to flip to the back for a surprise dessert chapter!

3-Layer Nut-Free Dream Cups

Yield
8 mini cups
Prep time
Cook time
0 minutes
Chill time
25 minutes
Total time
These dream cups are free of nuts, but you'd never know it! The bottom layer is made up with pure coconut butter. It adds a firm, snappy texture contrast to the naturally sweetened sunflower seed butter and homemade chocolate layers. Try these cups as a nut-free alternative to my popular Raw Almond Butter Cups.
Ingredients
For the base layer:
- 3 tablespoons melted coconut butter (from a packed 1/4 cup solid coconut butter)
For the middle layer:
- 1/4 cup sunflower seed butter
- 1 tablespoon + 1 teaspoon pure maple syrup
- 2 tablespoons virgin coconut oil, softened
- 1/2 teaspoon pure vanilla extract, optional
- pinch fine sea salt
For the top layer:
- 1/4 cup virgin coconut oil
- 1/4 cup unsweetened cocoa powder
- 2 tablespoons pure maple syrup
- pinch fine sea salt
- 2 1/2-3 tablespoons unsweetened large flake coconut
Directions
- If necessary, melt the coconut butter over the lowest heat in a saucepan until liquid.
- Spoon a scant teaspoon of melted coconut butter into a mini silicone cupcake mold and spread out evenly. You can probably use mini paper liners if you don't have silicone. Repeat for the rest (I made 8 mini cups). Place in the freezer.
- Prepare the middle layer: In a small bowl, stir together the sunflower butter, maple syrup, oil, vanilla (if using), and salt until smooth. Add a scant tablespoon of filling on top of each coconut butter layer. Smooth out and place in the freezer.
- Prepare the top layer: Add the coconut oil into a small saucepan and melt over low heat. Remove from heat and whisk in the cocoa powder, maple syrup, and salt until smooth.
- Add a tablespoon of melted chocolate on top of each cup. Top with a teaspoon of large flake coconut and gently press down.
- Freeze for about 25 minutes until solid. Allow to sit at room temperature for 5 minutes before enjoying. Store leftovers in the fridge, or for longer storage, the freezer.
Tip:
To make homemade coconut butter, process 3-4 cups of unsweetened shredded coconut in a heavy-duty food processor for 7-10 minutes, until smooth and liquid. Make sure the coconut you are using isn't stale or it won't turn into butter. Leftovers will keep in the fridge in an air tight container for at least a month, but often much longer. You can also use store-bought coconut butter.


These look amazing! And I’m so glad to hear you haven’t invited your testers yet – still crossing my fingers! Your first cookbook is still my favorite of all my many vegan cookbooks :)
Angela: These do truly look amazing! I don’t know where you live, but – for the moment – I live in Edgewater NJ and it’s snowing so much this year I’m ready to go nuts. So thanks for a recipe that’s nuts-free. ;) And yes, we miss you when you’re on baby-hiatus, but totally understand…as long as you keep posting adorable pix of Adriana. (Beautiful name!)
Wish I could be one of your testers, but I’m still packed from my move (I’m guessing WE’D be making the recipes) and it’s a darned good thing. Turns out, the apt. is illegal and I must move everything AGAIN. I’m shooting for Maui…
Oh I love this recipe! I am going to try it this weekend!
Looks amazing!
The perfekt birthday treat for me :-)
Thanks!
These look SO GOOD. I can’t wait to make them!!!
Tester still available:). Wow, nice job on the nut-free version!! And congrats on new life chapter and osg2!!!
Omigosh, those sound amazing and they’re so cute! Lol
Can’t wait to try these! I’ve missed your posts, but totally understand with a little princess needing your attention. When I’m looking for new inspiration I can always find it among previous posts that I haven’t tried yet.
Tip for the coconut butter: I had difficulty getting coconut butter that didn’t kill my machine and didn’t end up more grainy than smooth. I found that I get best results with my Blendtec Twister Jar by processing the coconut until it gets thick but not quite smooth, then dumping it out and letting both the coconut and blender cool off completely. I blended it a second time after it had cooled off – silky smooth within a couple minutes. Glorious!
Hey Angela, just wondering if you think I could use my Vitamix to make coconut butter or would it heat it and change the result? I have a food processor but it doesnt make anything smooth and really doesn’t work well. I have the dry container for the Vitamix, maybe use that? Thanks!
Can’t wait for your next cook book! Love how you create great vegan, gluten free desserts that taste good AND are able to keep the sugar levels low, so rare!
Best of luck whipping up some new recipes!
These look INCREDIBLE! Beautiful photos too! xx
www.pillarbox-post.blogspot.com
Those look delicious…can’t go wrong with healthy sweets.
These do look dreamy! They’ll be the perfect cool treat for the warmer weather… if it ever gets here haha.
Angie, mind = blown.
These look amazing, Ange! :) Do you think I could substitute the sunflower butter with peanut butter? I don’t like sunflower butter very much – but I love peanut butter!
Wow, 10,000 people want to be recipe testers and I’m one of them. Please pick me! Now to go and gather the ingredients for this awesome treat. My grandson will love it.
Angela! Thank you so much for this nut free recipe! I am going to make to bring to a friend’s house this weekend.
To you or anyone else in the comments any ideas for a cashew substitute in creamy recipes? Please help!
Oh my God, that looks delicious and easy to make. Thank you for sharing this link with us. I’m so excited, already. Can’t wait to taste it !
Looks devine. Another snack I can send to school. Thanks Angela.
10,000 people, oh my goodness—not surprising, though :) THANK you for the No Name brand coconut tip! I was seriously wondering what type would work best, and the price is right on this one: No Frills, here I come! These cups look amazing. Thanks, Angela.
Oh my goodness I want to eat these for breakfast! They are so beautiful. I have such a hard time finding unsweetened coconut here in the USA. Perhaps I’m looking in the wrong spot, I’ll keep looking because I totally need to make these cups :)
Hey Lauren, I don’t know if you live near a Walmart but I found unsweetened shredded coconut in the baking aisle at mine today!! It is the wild oats organic brand and it was roughly $2 a bag. I live in a nutritional wasteland so I was exuberant to find this on the shelves.
Thank you! I FINALLY found some today at Wegmans (greatest store)! I was starting to think grocers only thought Americans wanted sweet everything.
You are very welcome. OMG…love weggy’s. Are you a New Yorker or Pennsylvanian? I live in PA, not near a wegman’s but totally wish I did! That store rocks my world.
I’m in Maryland, it is seriously the greatest grocery store and has completely spoiled me to any other!
Wow – these look amazing! I woke up this morning thinking of what I can bring to a friend’s house tomorrow night….your almond butter cups came to mind so I was set on that. I clicked on your sight (as I do daily!) to see if there was an update – and it was like magic popping out of the screen! mmmmmm…I have not tried making the coconut butter yet but do love it and cringe when I buy it (I justify it bc it lasts quite awhile here)…I will try making it as I can see myself using it lots more esp if your 2nd book uses it a lot :)
Thanks for another great one Angela – sounds like you have been even more inspired of late ! Motherhood is good for you!