

I’m starting to twitch. That usually happens if it’s been longer than couple weeks without a blog post. Can you tell it’s been a bit crazy over here? I’ve had this draft open for over two weeks on my computer. As much as I don’t like being away from blogging, it’s refreshing to step back now and then. I’m really enjoying soaking up as much time with Adriana as I can. The weeks are flying by and it’s bittersweet when I think about how fast she’s growing. The second cookbook is also coming together really well. I’m so encouraged by how well the recipe development is going this time around! The recipes are turning out eyeball popping delicious. I’m so proud of each and every recipe that’s going into this book and I can’t wait for you to enjoy them with your loved ones!
Before I forget, I want to update you on my call for recipe testers. I know some of you assumed that you weren’t selected, but I actually haven’t contacted anyone yet as I’m running behind. I’m sorry for the delay; things tend to move at a glacial pace with a baby around! hah. It reminds me of one of my favourite quotes from the movie Devil Wears Prada: “By all means, move at a glacial pace…you know how that thrills me.” Oh Meryl, I love you. Anyway, I hope to send out email invites within the next month. We had a huge amount of volunteers – about 10,000 of you – crazy, right? Your enthusiasm is amazing. I will only be able to invite about 40 or 50 to start off with – I wish I could take you all up on your generous offer to help. Thank you all again so much!
If you’d like to see some cookbook teasers and what I’m up to behind the scenes, be sure to check out my Instagram account – I created a new hashtag called #osgcookbook2 where I will be sharing recipe teasers for the next several months.
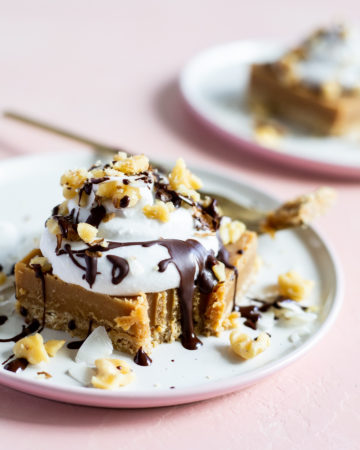
OK, now onto this recipe! I’ve been working on the dessert chapter for my cookbook. One thing you told me loud and clear about the first book is that you want more desserts (especially cookies). And you know what? I totally agree! So for this next book, I’ve created a bigger, more awesome dessert chapter. It’s gonna blow ya mind…trust me on this one. I decided these nut-free dream cups were just too good to hold onto. This recipe is inspired by one of the most popular recipes from 2013 – my Raw Almond Butter Cups. Many of you asked for an almond-free version so I made it nut-free and added a third layer for fun. While I love the almond butter cup recipe, these are my new favourite for sure. The snappy coconut butter base provides a great contrast to the creamy middle and chocolate topping.
I have recently fallen back in love with coconut butter during my recipe testing pursuits. It’s so darn easy to make at home (the first time I made it at home was back in 2010). Have you made it before? It’s pretty life-changing. The store-bought stuff is super expensive for some reason (why are those jars soooo much?), but making it at home is really cheap! I use a 400 gram bag of No Name unsweetened medium coconut (see below). You want to be sure you are using unsweetened shredded coconut and not flaked, sweetened, or low-fat kinds. Ontario folks, you can find this No Name bag at Fortinos and I’m guessing other grocers too. I find some shredded coconut to be hit or miss when making homemade coconut butter, but this bag works perfectly every single time! I’ve also found processing 3-4 cups at a time works best – anything less and it might not break down into butter. Also, make sure the coconut you are using is fresh – if the coconut is stale it most likely won’t turn into butter. The beauty is that the leftover coconut butter will keep for a very long time in the fridge or pantry and you’ll always have some handy for baking.


It’s such a treat to eat a spoonful of this warm homemade coconut butter!
To start off with, I added a scant teaspoon of coconut butter into each mini silicone mold. This is the one I use. They pop out so easily! I love using it for making homemade chocolate too. You can probably also use mini (or standard size if that’s all you have) cupcake paper liners.

Pop those in the freezer while you stir together the filling.

I made a very easy homemade chocolate for the topping using unsweetened cocoa powder, maple syrup, and coconut oil. All topped with large coconut flakes for a crunchy texture. Easily one of my favourite quick and easy desserts to come out of my kitchen in a while!


Featuring all new, protein-packed salads, hearty toppers, flavour boosters, and dressings you'll want to drink, my new cookbook will transform the way you think about salads. Oh, and be sure to flip to the back for a surprise dessert chapter!

3-Layer Nut-Free Dream Cups

Yield
8 mini cups
Prep time
Cook time
0 minutes
Chill time
25 minutes
Total time
These dream cups are free of nuts, but you'd never know it! The bottom layer is made up with pure coconut butter. It adds a firm, snappy texture contrast to the naturally sweetened sunflower seed butter and homemade chocolate layers. Try these cups as a nut-free alternative to my popular Raw Almond Butter Cups.
Ingredients
For the base layer:
- 3 tablespoons melted coconut butter (from a packed 1/4 cup solid coconut butter)
For the middle layer:
- 1/4 cup sunflower seed butter
- 1 tablespoon + 1 teaspoon pure maple syrup
- 2 tablespoons virgin coconut oil, softened
- 1/2 teaspoon pure vanilla extract, optional
- pinch fine sea salt
For the top layer:
- 1/4 cup virgin coconut oil
- 1/4 cup unsweetened cocoa powder
- 2 tablespoons pure maple syrup
- pinch fine sea salt
- 2 1/2-3 tablespoons unsweetened large flake coconut
Directions
- If necessary, melt the coconut butter over the lowest heat in a saucepan until liquid.
- Spoon a scant teaspoon of melted coconut butter into a mini silicone cupcake mold and spread out evenly. You can probably use mini paper liners if you don't have silicone. Repeat for the rest (I made 8 mini cups). Place in the freezer.
- Prepare the middle layer: In a small bowl, stir together the sunflower butter, maple syrup, oil, vanilla (if using), and salt until smooth. Add a scant tablespoon of filling on top of each coconut butter layer. Smooth out and place in the freezer.
- Prepare the top layer: Add the coconut oil into a small saucepan and melt over low heat. Remove from heat and whisk in the cocoa powder, maple syrup, and salt until smooth.
- Add a tablespoon of melted chocolate on top of each cup. Top with a teaspoon of large flake coconut and gently press down.
- Freeze for about 25 minutes until solid. Allow to sit at room temperature for 5 minutes before enjoying. Store leftovers in the fridge, or for longer storage, the freezer.
Tip:
To make homemade coconut butter, process 3-4 cups of unsweetened shredded coconut in a heavy-duty food processor for 7-10 minutes, until smooth and liquid. Make sure the coconut you are using isn't stale or it won't turn into butter. Leftovers will keep in the fridge in an air tight container for at least a month, but often much longer. You can also use store-bought coconut butter.


These are DEFINITELY “dream cups!” And I have GOT to try making my own coconut butter :)
Can’t wait to try this recipe! I’m still obsessed with the latest Snickerdoodle Cookie recipe – so very good!
I have the cutest bunny shaped silicone molds and I’m dying to try this recipe in that shape! I’m thinking this would be the perfect little treat for Easter!! Hopefully they pop out well! I will try to remember to comment how the shape turns out! :D
FYI, I realize that there is no vanilla extract in the recipe, but did you know that the Kirkland one from Costco actually has sugar in it.
Hi Paulette,
No I wasn’t aware of that, but thanks for the heads up.
These look fantastic! I have always wanted to try coconut butter, but yes, it is expensive…and grad student stipend isn’t conducive for buying expensive specialty items like that-so I love to make stuff like this myself to save $$ !! Totally agree with the more desserts-can never have too many…especially when chocolate is involved….mmmmm….
Oh my deliciousness! These look fabulous and most likely taste just as great! Can’t wait to try them!
Oh my. Those look amazingly yummy. I love sunflower butter freezer fudge so this is going to take it to a whole new level for me. Thanks for the recipe and looking forward to your next book. And you should indeed be enjoying every moment with Adriana. :)
As someone with a dairy intolerance and a nut allergy I can’t tell you how happy this recipe has made me. I will be trying it straight away! Thank you!
Milli
artsandgraces.com
The only thing I’m confused about is why there is vanilla extract in the photos of what ingredients are used, when its not listed in the instructions/ingredients used. I hope these turn out right! Crossing my fingers!! :)
Hi Emily,
Thanks so much for mentioning this, I missed it when I was writting up the recipe. I used a 1/2 teaspoon, but it will work without it as well. It is now added into the recipe.
Thanks!
When I used to think of healthy eating, I always just thought of a bowl of rabbit food! Now I’ve researched into it I realise there’s so much more to it and hundreds of delicious recipes out there, that are completely healthy, this baffles me slightly.. Especially the desert aspect of it all! You’re one of the people that has taught me that, I love your blog! Both of your cookbooks are on with wish list :-)
Woohhoo! SOOOO making my own coconut butter! Buh bye $12 dollar jars, hello No Name
Shut the front door – these look amazing! Making these right now.
I made these Dream Cups today and they were delish! I made them in square chocolate molds for a handmade chocolate treat; finally, there will be a treat for me after dinner! Amazing recipe -thanks, Angela!
These are so good! I made them with peanut butter instead of sunflower butter and they turned out amazing. An easy to make and super yummy recipe. Make these tonight!
Did you do a straight substitution with peanut butter? Did you need to alter the amount of any of the other ingredients for the middle layer?
Could you explain the difference between coconut butter and coconut oil? I use the oil on a regular basis but I’ve never seen “butter” in stores. Now I’m looking forward to whipping up a batch just to experience the difference!
This looks like a lovely dessert!
Coconut butter is thick and smooth and harder at room temperature than coconut oil. It is made from coconut meat. Coconut oil is solid at room temperature as well but melts at a lower temperature than coconut butter, it is not made with coconut meat. Sometimes coconut butter is called coconut manna. At our natural good store I found the coconut butter in the nut butter section, not in the oil section. Hope that helps!
Hi Angela,
I discovered your blog a few months ago and am absolutely obsessed with it!
I have to say, Sketchie had to be one of the cutest cats I have ever seen.
Photos of him are reason enough to visit the site!
I adore your recipes though, and was wondering if you would
have a recipe for millionaire shortbread (aka caramel squares)
that would be a healthy alternative to the indulgent and
sickly original. I have found a few, but want one without
coconut milk or coconut sugar.
Thanks and keep up the fabulous recipes!
I have been wanting to do a nutfree peanut butter cup, but I love the addition of the coconut butter.
Ha! I just bought my first jar of coconut butter and thought the price was crazy! Had no idea I could make it at home! These cups look amazing : )
Goodness! I’m drooling over that coconut butter. I am in love with your blog seriously!
I made them today & loved them! They rocked my taste buds,…ooh yes!