

I’m starting to twitch. That usually happens if it’s been longer than couple weeks without a blog post. Can you tell it’s been a bit crazy over here? I’ve had this draft open for over two weeks on my computer. As much as I don’t like being away from blogging, it’s refreshing to step back now and then. I’m really enjoying soaking up as much time with Adriana as I can. The weeks are flying by and it’s bittersweet when I think about how fast she’s growing. The second cookbook is also coming together really well. I’m so encouraged by how well the recipe development is going this time around! The recipes are turning out eyeball popping delicious. I’m so proud of each and every recipe that’s going into this book and I can’t wait for you to enjoy them with your loved ones!
Before I forget, I want to update you on my call for recipe testers. I know some of you assumed that you weren’t selected, but I actually haven’t contacted anyone yet as I’m running behind. I’m sorry for the delay; things tend to move at a glacial pace with a baby around! hah. It reminds me of one of my favourite quotes from the movie Devil Wears Prada: “By all means, move at a glacial pace…you know how that thrills me.” Oh Meryl, I love you. Anyway, I hope to send out email invites within the next month. We had a huge amount of volunteers – about 10,000 of you – crazy, right? Your enthusiasm is amazing. I will only be able to invite about 40 or 50 to start off with – I wish I could take you all up on your generous offer to help. Thank you all again so much!
If you’d like to see some cookbook teasers and what I’m up to behind the scenes, be sure to check out my Instagram account – I created a new hashtag called #osgcookbook2 where I will be sharing recipe teasers for the next several months.
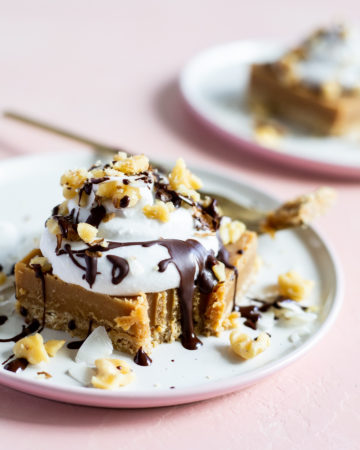
OK, now onto this recipe! I’ve been working on the dessert chapter for my cookbook. One thing you told me loud and clear about the first book is that you want more desserts (especially cookies). And you know what? I totally agree! So for this next book, I’ve created a bigger, more awesome dessert chapter. It’s gonna blow ya mind…trust me on this one. I decided these nut-free dream cups were just too good to hold onto. This recipe is inspired by one of the most popular recipes from 2013 – my Raw Almond Butter Cups. Many of you asked for an almond-free version so I made it nut-free and added a third layer for fun. While I love the almond butter cup recipe, these are my new favourite for sure. The snappy coconut butter base provides a great contrast to the creamy middle and chocolate topping.
I have recently fallen back in love with coconut butter during my recipe testing pursuits. It’s so darn easy to make at home (the first time I made it at home was back in 2010). Have you made it before? It’s pretty life-changing. The store-bought stuff is super expensive for some reason (why are those jars soooo much?), but making it at home is really cheap! I use a 400 gram bag of No Name unsweetened medium coconut (see below). You want to be sure you are using unsweetened shredded coconut and not flaked, sweetened, or low-fat kinds. Ontario folks, you can find this No Name bag at Fortinos and I’m guessing other grocers too. I find some shredded coconut to be hit or miss when making homemade coconut butter, but this bag works perfectly every single time! I’ve also found processing 3-4 cups at a time works best – anything less and it might not break down into butter. Also, make sure the coconut you are using is fresh – if the coconut is stale it most likely won’t turn into butter. The beauty is that the leftover coconut butter will keep for a very long time in the fridge or pantry and you’ll always have some handy for baking.


It’s such a treat to eat a spoonful of this warm homemade coconut butter!
To start off with, I added a scant teaspoon of coconut butter into each mini silicone mold. This is the one I use. They pop out so easily! I love using it for making homemade chocolate too. You can probably also use mini (or standard size if that’s all you have) cupcake paper liners.

Pop those in the freezer while you stir together the filling.

I made a very easy homemade chocolate for the topping using unsweetened cocoa powder, maple syrup, and coconut oil. All topped with large coconut flakes for a crunchy texture. Easily one of my favourite quick and easy desserts to come out of my kitchen in a while!


Featuring all new, protein-packed salads, hearty toppers, flavour boosters, and dressings you'll want to drink, my new cookbook will transform the way you think about salads. Oh, and be sure to flip to the back for a surprise dessert chapter!

3-Layer Nut-Free Dream Cups

Yield
8 mini cups
Prep time
Cook time
0 minutes
Chill time
25 minutes
Total time
These dream cups are free of nuts, but you'd never know it! The bottom layer is made up with pure coconut butter. It adds a firm, snappy texture contrast to the naturally sweetened sunflower seed butter and homemade chocolate layers. Try these cups as a nut-free alternative to my popular Raw Almond Butter Cups.
Ingredients
For the base layer:
- 3 tablespoons melted coconut butter (from a packed 1/4 cup solid coconut butter)
For the middle layer:
- 1/4 cup sunflower seed butter
- 1 tablespoon + 1 teaspoon pure maple syrup
- 2 tablespoons virgin coconut oil, softened
- 1/2 teaspoon pure vanilla extract, optional
- pinch fine sea salt
For the top layer:
- 1/4 cup virgin coconut oil
- 1/4 cup unsweetened cocoa powder
- 2 tablespoons pure maple syrup
- pinch fine sea salt
- 2 1/2-3 tablespoons unsweetened large flake coconut
Directions
- If necessary, melt the coconut butter over the lowest heat in a saucepan until liquid.
- Spoon a scant teaspoon of melted coconut butter into a mini silicone cupcake mold and spread out evenly. You can probably use mini paper liners if you don't have silicone. Repeat for the rest (I made 8 mini cups). Place in the freezer.
- Prepare the middle layer: In a small bowl, stir together the sunflower butter, maple syrup, oil, vanilla (if using), and salt until smooth. Add a scant tablespoon of filling on top of each coconut butter layer. Smooth out and place in the freezer.
- Prepare the top layer: Add the coconut oil into a small saucepan and melt over low heat. Remove from heat and whisk in the cocoa powder, maple syrup, and salt until smooth.
- Add a tablespoon of melted chocolate on top of each cup. Top with a teaspoon of large flake coconut and gently press down.
- Freeze for about 25 minutes until solid. Allow to sit at room temperature for 5 minutes before enjoying. Store leftovers in the fridge, or for longer storage, the freezer.
Tip:
To make homemade coconut butter, process 3-4 cups of unsweetened shredded coconut in a heavy-duty food processor for 7-10 minutes, until smooth and liquid. Make sure the coconut you are using isn't stale or it won't turn into butter. Leftovers will keep in the fridge in an air tight container for at least a month, but often much longer. You can also use store-bought coconut butter.


You sound happy-busy! I CAN’T WAIT for the new cookbook! It’s awesome to know it’s going so well. May I put in my vote for more mains, sides, and salads? Your desserts are AMAZING, but for me, more special occasion. My sweet tooth can’t be trusted to stop once it gets started! It’s the day-to-day recipes I really treasure. My copy of your cookbook is already all sorts of worn and dog-eared in the entree section. I can’t tell you enough how much I appreciate those recipes! And the balsamic dressing recipe…it’s the best. I make it once or twice a week!
These look amaaazing! I was so happy to see a new post, and this one is extra exiting :) You sound really busy, but in the best way!
Holy heck, I was just about to make something very similar to these, but in bar form. These look like HEAVEN!!! Now I think ill pick up a mini silicone muffin pan and make them like you have above. :) One of my favorite desserts lately is coconut bark. All I do is melt down some coconut butter, spread on to wax paper, drizzle with a homemade melted chocolate mixture (like your recipe above) then sprinkle with shredded coconut and chopped nuts if I feel like it. Add a pinch of fleur de sel, freeze and its heaven! (must keep frozen) Such a great evening after dinner treat!
I can’t wait for your second cookbook. I missed out on the call for recipe testers. I think that was around the time that I had Caroline. Darn! Would have loved to help out with this (from a mom and RD standpoint). I am getting so many clients lately that are either vegan or have tons of food allergies!
i love you. i was just thinking how long its been since you posted something. and this is soooo worth the wait. thank you for the nut free option. nut allergy in our house. can’t wait to test this out.
I WANT I WANT I WANT!!!
This looks so delicious I want to run home and make some…
Thank you for your post, I almost obsessively was looking for your post daily for the past two weeks :P
I am so excited about your next book :)
Have a great week :)
3 of my favorite things!! I, too, have recently found a love of coconut butter. The texture fascinates me! And the fat/carb ratio really satisfies me at night. Looking forward to making these. And also keeping my fingers crossed to be a recipe tester! =)
My goodness these are gorgeous! Why is it that the simplest food creations are the best? Thanks for sharing!
I’ve been craving coconut butter lately and have been really wanting to make some. This recipe just solidifies the fact that I NEED to. These look
delicious!
You certainly got the dream part right! ;)
I don’t have a single ingredient to make these besides the salt… but chances are I might this weekend!
-E
NEED. THESE.
These are gorgeous! How in the world do you keep your layers so perfect and neat?! Brava!
This sure is one of those eat with your eyes first ones because if it’s half as delicious as it looks…swoon!
You are Wonder Woman – a new mom, a tea shoppe, a kick-butt blog, AND a new cookbook? How do you find time for it all?!
This recipe looks amazing – I’ll definitely be giving it a try with all of my nut-free friends!
Oh wow, I had no idea you could make coconut butter like that! I always skip past recipes with coconut butter because as you said – ultra expensive and I never have any on hand. I’ll have to give this a try!
Those look so good! Now if only I liked coconut…
Glad things are going well and it’s good to see you still working behind the scenes. Definitely take time for the things that matter though and we will always be here (anxiously awaiting delicious recipes) when you get around to it.
I am definitely excited for more desserts in the next cookbook; those are my favorites of yours. In fact, I plan to make a big batch of your trail mix cookies for my “graduation class” at the studio where I have been interning. Every time I make them people rave!
I feel ya. I cannot stand the taste of coconut. In small amounts, like in a granola bar, I can do. But anything else is too much. Though I’ve made and continue to make recipes with coconut in them in hopes of my palate changing. Ha ha.
Any chance you could use that coconut butter as lotion as well…. or is it a different kind of coconut butter?
I don’t know about the butter, but I use coconut oil as lotion all the time, and its great.
Thanks for sharing how to make coconut butter!
These look amazing and I am in need of another dessert to make besides the peanut better balls! Been making way too many of those lately:)
I want these right now! Thank you for posting the link to the mold! I really need one!
So excited about trying to make my own coconut butter! Love the 3 layers here. Always so impressed by your ideas. Excited for your new cookbook too!