
10 YEARS!!! Can someone please tell me how it’s been a decade since I wrote my very first blog post? We’re celebrating today with this incredible vegan dessert and a weeklong OSG Recipe App sale for charity (deets below).
When I started my blog on October 31, 2008, Eric and I were newly married and living in Toronto while I was working full-time as a researcher and wrapping up my Master’s degree. Life was pretty chaotic, and completing my degree was starting to wear me down (at one point I thought I was just going to cut my losses, throw in the towel, and move on!). This blog was the most amazing creative outlet during a time when my life was lacking the kind of creativity that I absolutely craved. It allowed me to explore a side of myself that I hadn’t since I was a kid (like my love for photography, baking, creative writing/journaling, and just being a goof). My blog’s first tagline was “Food. Fitness. Fashion. Fun.” Pretty epic, right? Lol. I’m grateful to Eric for encouraging me to “find a hobby” after years of exhausting myself with school and work. He still jokes that my “hobby” turned into my career, so I need to find a new hobby now. (Fine, I’ll start my own animal farm! YOU WIN!)
I find writing therapeutic in soooo many ways. In the early days, I didn’t have more than a handful of readers, and I found it quite easy to talk about my struggles online. I was like no one is going to read this anyway! It was an online journal of sorts, and I wrote about my history with disordered eating and how I was finally getting myself on a path to recovery. I shared the challenges I faced finding a career that I was truly passionate about (and, eventually, how I relinquished my need to people-please by completely changing my career path). I had the most supportive response from those first early blog readers (as well as my friends and family), so I kept writing with my heart on my sleeve.
After coming in the top 3 of the food blogging challenge Project Food Blog, an editor from a major publishing house emailed me saying she loved my work and was wondering if I’d like to write a cookbook. Pretty sure I fainted! It was the email that changed everything and solidified the fact that I was on the right path after doubting myself and my decision to change careers for so long.
So here we are 1 blog, 3 moves, 2 cookbooks, 2 kids, and 1 recipe app later…including countless late nights, self-doubt, and (ongoing) indecision for good measure! It sure has been a wild ride! I’m still learning and dreaming of new goals every day (all while not having the slightest clue how to get there!). Above all, I’m really proud of the fact that I’ve stayed true to myself and the values I have for this hobby-turned-business. The best part is that I’ve been lucky to meet so many of you amazing people online and in person, and I still can’t quite believe how freakin’ genuine, cool, and supportive everyone has been! It’s so crazy to think that some of my best friendships have been made through this blog. Forever grateful. Thank you from the bottom of my veggie-lovin’ heart for making this such a fun journey. And cheers to the next 10 years! Any guesses as to what adventures they’ll bring for you or me?
To celebrate OSG’s 10-year anniversary, we’re having a big OSG Recipe App sale this week with 100% of the proceeds being donated to Mothers Against Drunk Driving Canada. Right now our app is just 99 cents, so if you’ve been thinking about downloading it, this week is a great time to do so while supporting a fantastic cause that’s near and dear to my heart! You can find our recipe app on both the iTunes and Google Play stores. Thank you so much for all of your amazing support and for helping us give back to our community.
I had so much fun celebrating Canada’s food writers at the Taste Canada Awards Gala last night! We were nominated in the Food Blogs Health and Special Diet category, and I was so honoured to take home Gold! All I could think about was how grateful I am to have this recognition, especially so close to OSG’s 10-year milestone. Plus, Adriana and Arlo have been calling all of my food “YUCKY” lately, so now I can show them the award and explain that they’ve been outvoted, lol.
Last but not least, we’re having a little party to celebrate 10 years and this new dessert is on the menu. I hope you’ll enjoy every bite as much as we have! With Halloween tomorrow, I can’t think of a better time to indulge in some creamy, dreamy, chocolaty PB goodness.


Featuring all new, protein-packed salads, hearty toppers, flavour boosters, and dressings you'll want to drink, my new cookbook will transform the way you think about salads. Oh, and be sure to flip to the back for a surprise dessert chapter!

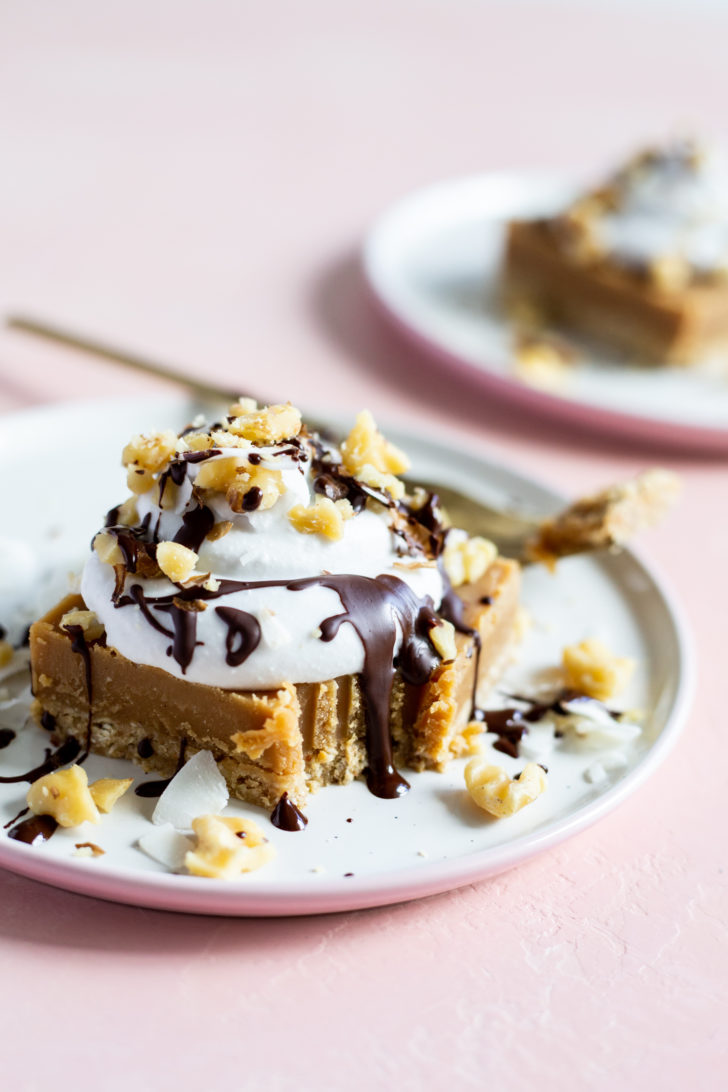
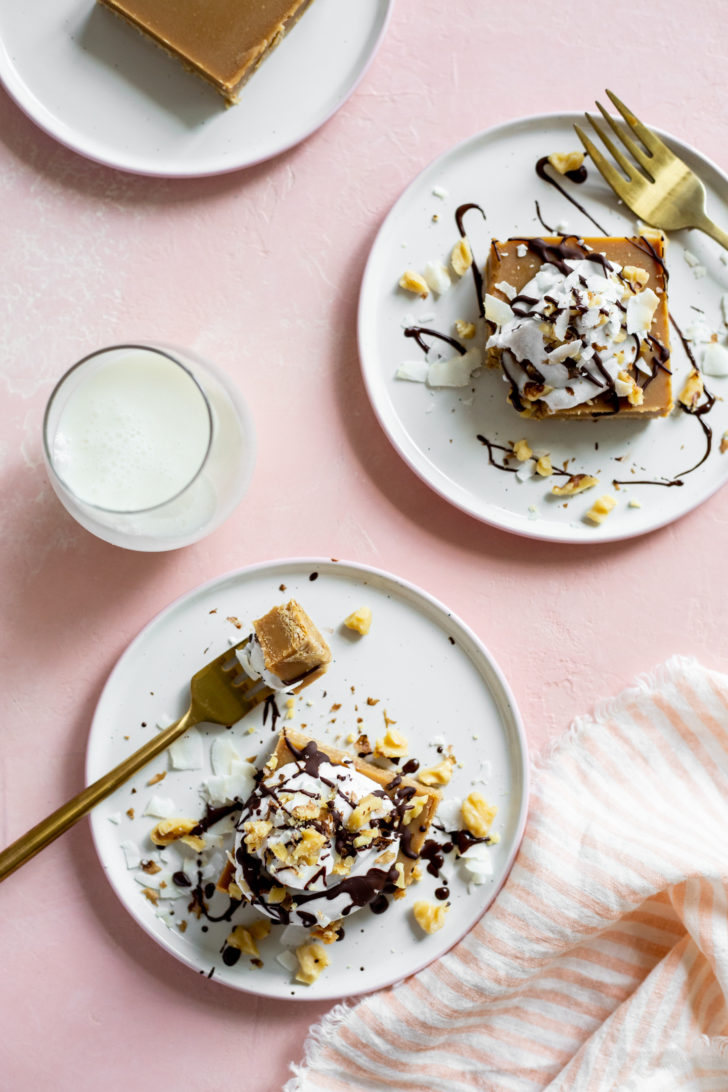
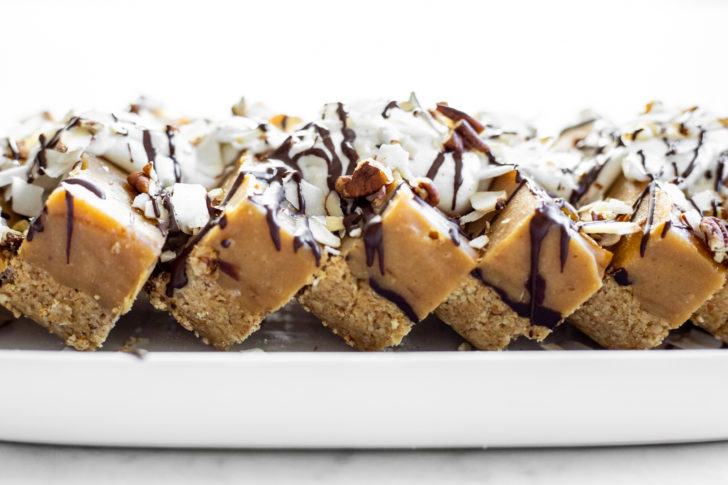
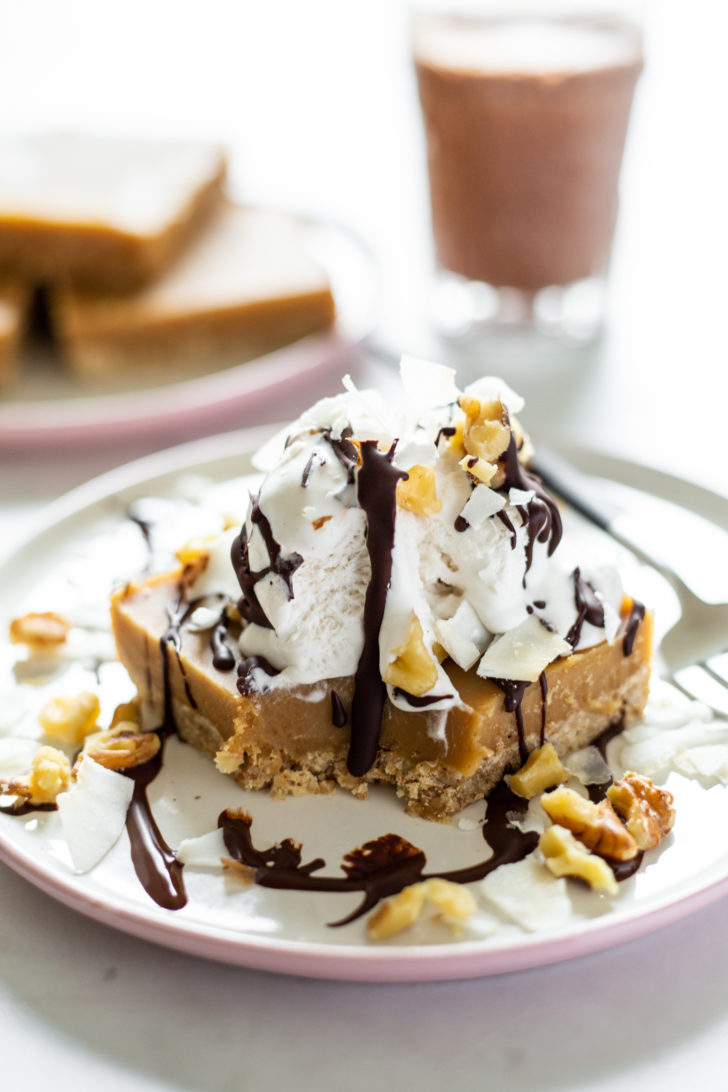
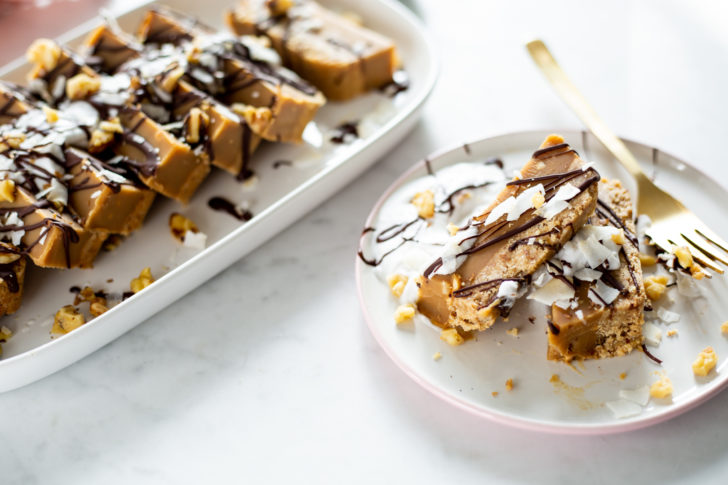
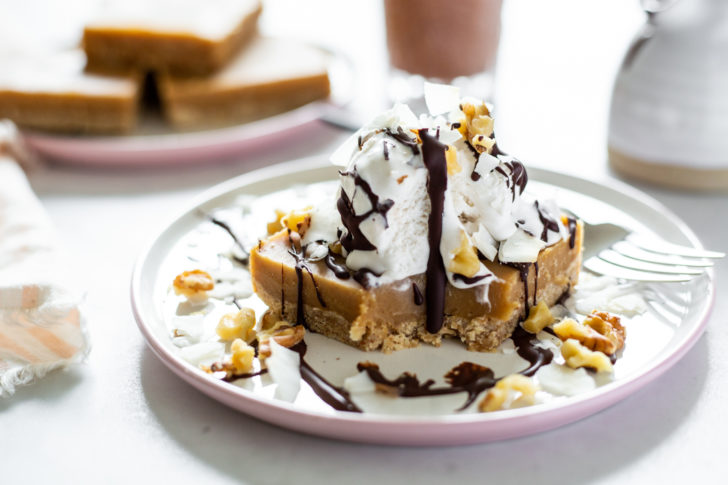
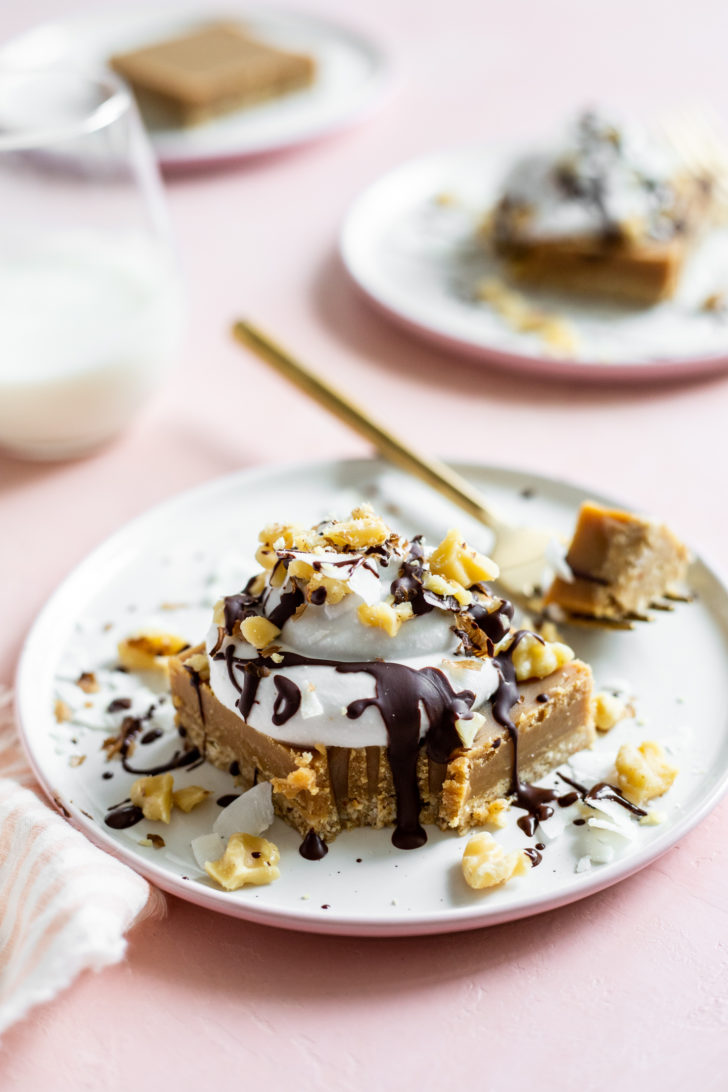
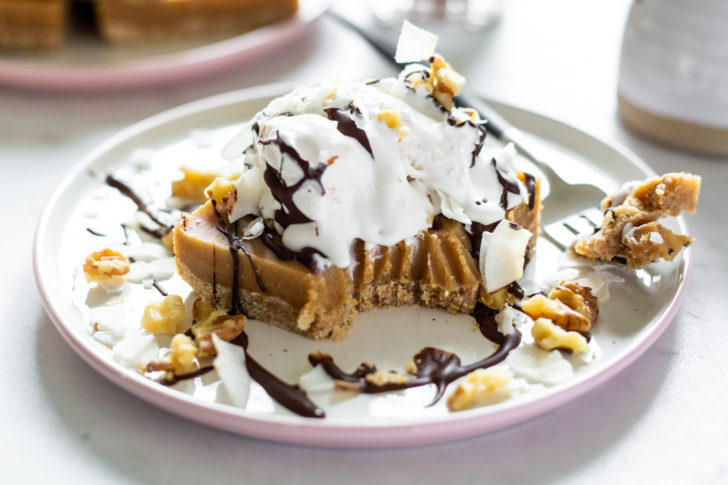
Salted Peanut Butter Crunch Torte

Yield
12 small or 9 medium servings
Prep time
Cook time
Chill time
2 hours
Total time
While dreaming up a recipe to celebrate Oh She Glows’ 10-year anniversary, I immediately thought of one of my all-time favourite flavour combos: salted peanut butter and chocolate! Hubba hubba. This salted peanut butter torte (of pure sweet heaven) is easy to throw together and only takes a couple hours to freeze. Its creative presentation will impress the heck out of your guests, and that irresistible sweet-salty flavour and creamy, crunchy texture will blow your taste buds away! I’ve also tested this torte with 3 different fillings: peanut butter, almond butter, and a nut-free sunflower seed butter version! And guess what? They’re all so delicious we couldn’t pick a favourite! See my Tips for how to make the sunflower seed and almond butter versions.
Ingredients
For the crust:
- 1/2 cup (78 g) almonds
- 1 cup (100 g) gluten-free rolled oats
- 1/4 teaspoon fine sea salt
- 1/4 cup (60 mL) coconut oil, melted
- 3 tablespoons (45 mL) pure maple syrup
- 2 tablespoons (30 mL) smooth natural peanut butter
For the filling:
- 1/2 cup (125 mL) coconut oil
- 1/3 cup (80 mL) coconut cream*
- 1/2 cup (125 mL) pure maple syrup
- 3/4 cup (185 g) smooth natural peanut butter
- 1/4 teaspoon fine sea salt, or to taste
- 1/2 teaspoon pure vanilla extract
For topping (optional, but recommended):
- Coconut Whipped Cream**
- 1/2 cup (95 g) non-dairy chocolate chips
- 1 teaspoon (5 mL) coconut oil, melted***
- 1/2 cup (80 g) chopped toasted walnuts and large-flake coconut****
Directions
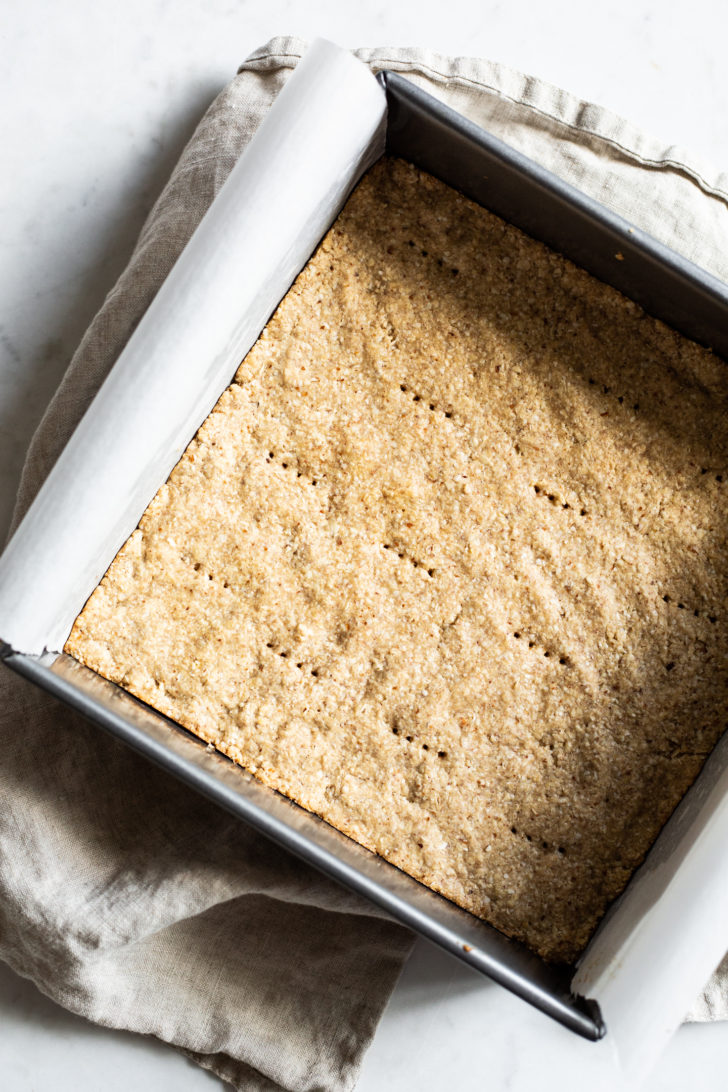
- Preheat oven to 350°F (180°C). Lightly grease an 8x8-inch square pan with coconut oil (including up the sides, too). Cut a piece of parchment paper to fit the width of the pan with a bit of overhang so it’s easy to lift out.
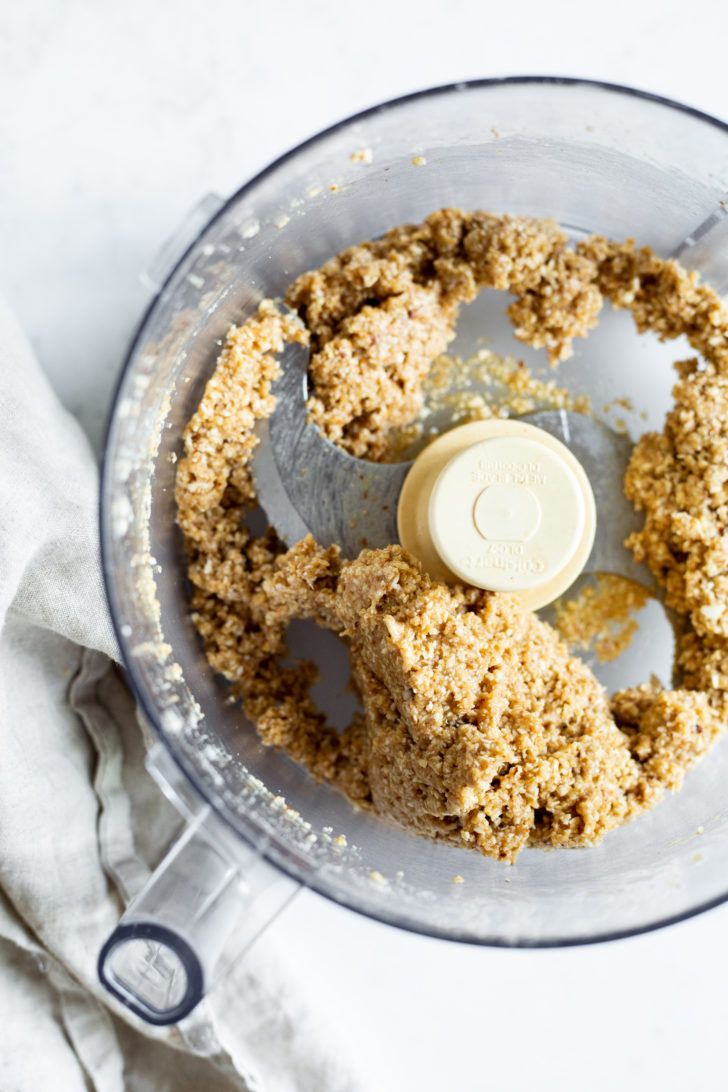
- For the crust: Add the almonds, oats, and salt to a food processor and process until the mixture resembles a coarse flour, about 30 seconds.
- Melt the 1/4 cup coconut oil in a medium pot (you’ll be using the same medium pot for the filling) over low heat. Add the melted oil, maple syrup, and peanut butter to the processor and process until the mixture comes together in a heavy dough, 10 to 15 seconds. The dough should look like a wet cookie dough. If you find it a bit dry, add a teaspoon or two of water and process again until a wet dough forms.
- Spoon the dough into the prepared pan and crumble it evenly all over the base. Lightly wet your fingers and press the dough into the base firmly and evenly. Level the edges with your fingertips. Poke the base with a fork about 12 times to allow air to escape while baking.
- Bake the crust for 9 to 11 minutes, until it looks pale and a bit puffy. The crust might look underbaked when you remove it, but this is what we want to avoid drying it out.
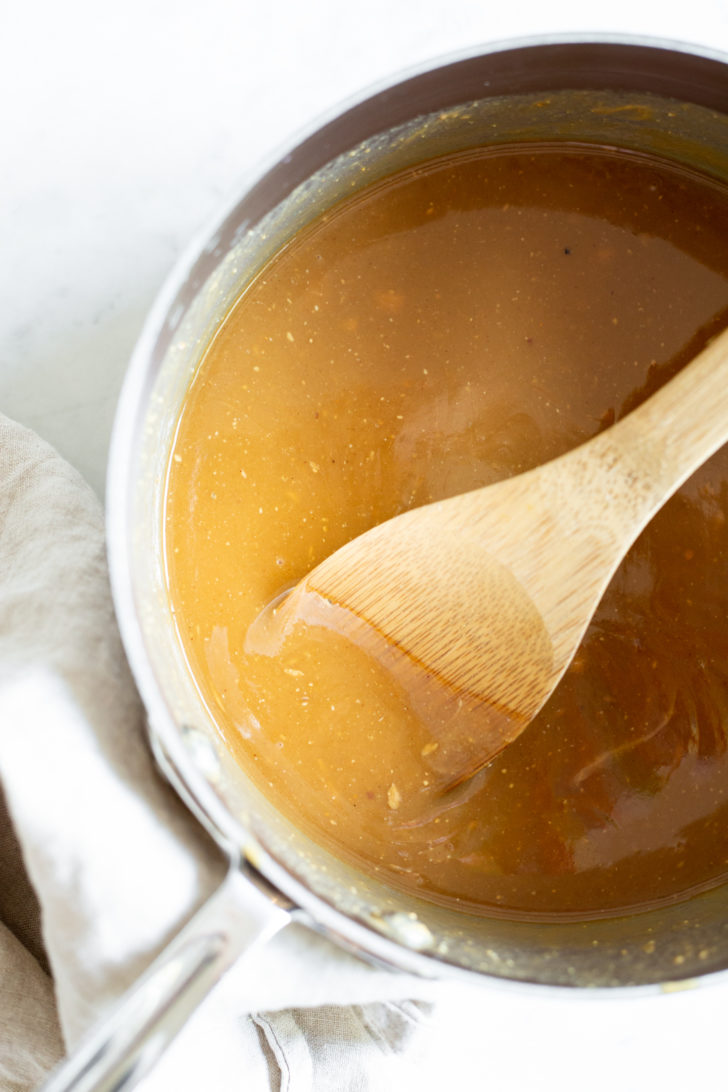
- Meanwhile, make the filling: In the same medium pot (no need to clean it!), melt the coconut oil and coconut cream over low heat. Now add the maple syrup, peanut butter, salt, and vanilla and whisk until smooth.
- Spoon the filling onto the crust (there’s no need to cool the crust first) and carefully transfer the dish to a level surface in your freezer. Chill until solid, about 2 hours. If I’m not serving the torte right away, I’ll cover the pan with tinfoil after a couple hours of freezing. While it chills, prepare the Coconut Whipped Cream and gather the toppings so they’re ready to go.
- Once frozen, remove from the freezer and let it sit on the counter for 10 minutes. Slide a knife around the edges to loosen the slab. Using the parchment paper, lift the slab out and place it on a serving platter. Slice into slices of your desired width. Now add the toppings: I add a large dollop of Coconut Whipped Cream on each and then top it with lots of drizzled melted chocolate, walnuts, and large-flake coconut. A pinch of coarse sea salt is nice too. If you have leftover melted chocolate, serve it on the side in a small dish so you can spoon some more chocolate over top while eating (trust me on this one!). Serve immediately—the combo of cold filling and warm melted chocolate is just dreamy! But the chilled leftovers (with hardened chocolate) are totally irresistible too.
- Storage tips: The filling softens a great deal at room temperature, so it's best not to leave leftovers on the counter for longer than half an hour. Return it to the fridge or freezer for best results. Cover leftover slices and store in the fridge for up to 1 week, or you can freeze the slices for 4 to 6 weeks. I like to wrap frozen slices in tinfoil and then place them all into a freezer-safe zip bag.
Tip:
* Chill your can of full-fat coconut milk for at least 12 hours before you begin this recipe so that the cream on top is solid. After making the torte, you’ll have some leftover coconut cream in the can which can be used to make Coconut Whipped Cream for the topping!
** Feel free to use store-bought coconut whipped cream instead. I like “So Delicious Dairy Free CocoWhip!”
*** To a small pot over low heat, add the chocolate and oil. Stir until smooth and combined.
**** Of course you can use roasted peanuts instead. I’m not a big fan of them so I prefer to use walnuts.
Make it nut-free: In the crust, swap the almonds for sunflower seeds and in the filling swap the peanut butter for roasted sunflower seed butter. I like to add an extra tablespoon of maple syrup and a pinch of salt to this version—the filling tastes like salted caramel!
Almond butter version: Swap the peanut butter for roasted almond butter.
Don’t have an 8x8-inch square pan? You can make this in an 8x4-inch loaf pan or standard-size muffin tin (both greased with coconut oil).
Nutrition Information
(click to expand)


This. Looks. Delicious. I’ve just ‘gone vegan,’ as they say, after a long time coming, and I’m especially on the hunt for tasty desert recipes. Definitely going to try this one (although maybe I won’t risk the sparkler with my track record for clumsiness!).
Jess
haha I wouldn’t recommend using the sparkler either ;) congrats on going vegan and I hope you love the recipes here!
Looks amazingly delicious! Congratulations on 10 years. It is so interesting that we can struggle with self doubt and indecision, even when loads of folks tell us we have a special gift! Or, when our fussy toddlers would rather eat Chick Fil A French fries than a bowl of healthy 8 min curry! I thank you for so many great recipes, that at least my husband and I LOVE. My kids do Love your sweet dessert recipes, though, lol! I double all your recipes, without a second thought, and am so thankful for your help getting our family to eat more veggies. Anyway, after my kids brought home horrendously sugary candy this Halloween, I snuck a few chocolate peanut butter candies that disappointingly don’t taste like either peanut butter or chocolate! Lol. What would you think of sandwiching this peanut butter filling between the two layers of your raw 2-layer brownies? If you are too busy to reply, i might just give it a whirl to kick this chocolate peanut butter craving of mine.
Have a wonderful Thanksgiving and know our family is thankful for you, Angela!
That sounds like a GREAT idea!! hah. wow!! Did you end up trying it yet?
Thank you so much for your kind words too Danielle. I appreciate your support so much!
Hi again, Angela!
I tried the raw brownies with the peanut butter layer from this recipe, and it is delicious! I made a double batch of the brownies and chocolate topping. I made the peanut butter filling using a 1 cup PB basis for the recipe (instead of 3/4 cup). I had to substitute equal parts of almonds and cashews for the walnuts in the brownie recipe because my son is allergic to walnuts, so I don’t know if the bitterness of the walnuts would be preferable to the extra sweetness of the almonds and cashews. Hope this is helpful.
BTW, LOVE the sparkler photos in this post! Your photographer has a gift!
Oh I’m so glad you tried it out! Thanks for following up :) What you made sounds like a dream come true, hah. And thanks so much for your kind words about my photography! It was a fun shoot.
Oh wow! I need to make this recipe!
Time goes by soooooooo fast! What a great body of work you have here, though! And a beautiful dessert! Congrats on 10 years :). Well done!
Thank you Lisa!
I love your vegan salted peanut butter so as the frosting. This is surely an awesome dessert.
My sister made me this recipe and it was SO delicious! thanks for sharing your creative recipe making talents so we can all enjoy Angela :)
I’m so glad to hear that Katelyn! Thanks for your kind words :)
Hey Angela! This looks delicious!!! Can I use a can of coconut cream instead of coconut milk? Would I still need to refrigerate it and use only the top part?
hey Chantal, I’m sorry I haven’t worked with cans of coconut cream before so I’m not sure. Is there any water in them? You’d only want to use the white cream portion. Hope this helps!
sorry for my question, can you clarify what type of almonds? raw or roasted? i’m assuming unsalted ? thank you!
For sure…I used raw :)
We are on a low saturated fat diet. What can we use in place of the coconut cream and coconut oil in this recipe? Thanks for your help.
Hi Wendy, I’m sorry I don’t know of any subs for coconut in this recipe. If you try anything I would love to hear how it goes!
Oh my goodness! Congrats on 10 years, Ive had your recipe book for years, keep up the good work
Thank you Bella! I appreciate your support so much!
I love this and I do not typically do dessert but this is one I could get behind for sure! Can’t wait to try it!!!
Just made this recipe–in the freezer as I speak! The 1/4c coconut oil in the crust happened to be WAY too much for me! I covered 4 paper towels with oil just trying to soak some of it up before putting it in the oven. I’d recommend slowly adding oil to your food processor in case you don’t end up needing it all!
Hi Ali, Oh that’s so strange about the oil! We didn’t have that issue at all. Is it possible the measures were off somehow with the crust? I hope you still enjoyed it!
I’m allergic to peanuts; would almond or cashew butter work just as well?
Hey Rebecca, I’ve tried almond butter and it was delicious! I haven’t tried cashew butter yet.
Hello Angela,
Happy Holidays! Thank you for this delicious recipe. I randomly have a jar of coconut butter and am not sure what I should do with it. Do you think the coconut butter can be subbed for the the coconut cream in the filling part? Thanks again!
hi there, I think it would be too firm, but I’m not positive!
That looks insanely delicious!
Congrats on 10 years 3> 3>
Thank you Mor! :)
Hey Angela, congrats. Didn’t know this blog’s been online for 10 years! I have been regularly following you for the past 2 years and it’s been a wonderful experience. I’m gonna try this recipe out this weekend with my kids.
Aww thanks for your kind words Hannah! I can’t quite believe it’s been that long either. I’m so happy you’re enjoying the blog…thanks for your support! ❤️
Angela!
Congrats gf! What an amazing accomplishment! An awesome blog, awards, books, babies, a tea business, and so much more! YOU ARE ONE AMAZING WOMAN!
I had to comment because I made this cake and OMG it’s honestly to die for! I shared it on my facebook page too! Thank you for making such quality desserts (really all your recipes are)!
Love Mandy
Thank you SO much Mandy!! Your kind words and support are so appreciated!
I’m so glad you loved the torte so much…it’s one of my fave creations. Thanks for sharing!
This is SO good! I made one modification and added 1/4 cup of chocolate chips to the filling for a delicious, creamy peanut butter filling. It didn’t even need the whipped coconut cream topping. The only problem is I can’t stop eating them! Thanks for sharing your recipes online.
I’ve been looking for a new peanut butter dessert recipe and as soon as I saw the first picture I knew I had to try this. I’m not usually great with desserts but I’m trying to get better – being able to do a nice cream topping will really make a difference. I’ll let you know how it turns out!
Thank you so much for sharing this beautiful delicious recipe :)