

A couple weeks ago, a reader named Cara emailed me with a recipe request for a vegan spring stuffing. Her complaint with traditional stuffing was that it felt too much like autumn instead of spring; it tends to be heavy, instead of light and fresh.
Cara is onto something here, don’t you think?
I love when I get recipe requests because I feel like I have a mission instead of just aimlessly trying to think up recipe ideas all the time. It’s also fun to be presented with a “problem” and then hopefully making someone happy with the end result.

I got to work rounding up some of my favourite green spring-time vegetables like asparagus, green onions, and peas. I also picked up some fresh parsley and thyme for flavour. This is turning out to be one green spring stuffing!

I also recommend using a hearty seed & raisin/cranberry bread (from your grocer’s bakery is fine!). The raisins and cranberries in the bread will add just a hint of sweetness, but it won’t overwhelm the stuffing. The seeds will also add texture and the thick crust will prevent the entire thing from turning to mush. I have no idea how this stuffing would turn out with another type of bread.
When you get home, slice the bread and roughly chop it up (or tear it) into 1 inch chunks. I like to leave my pieces a bit large to add texture to the finished product. Place the bread onto a baking sheet and leave out for 10-12 hours to dry out (I put mine in the oven (turned off) because Sketchie loves to steal bread!)

The next day we can officially begin. Sauté the olive oil, minced garlic, carrots, and asparagus until they are just tender. Be sure not to overcook it as you want the veggies to retain some crispness in the stuffing.

Now add in the peas and edamame and cook until heated through. Next, is the part that you do not want to skip – season the vegetables very well! I used a generous amount of Herbamare and ground black pepper. The Herbamare was fantastic in this, so if you can pick some up, I highly recommend it.

Remove from heat and stir in the bread.

followed by the fresh and dried herbs.

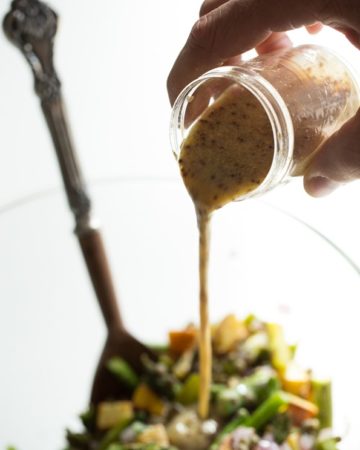
Finally, gently stir in 1 cup of vegetable broth. Many stuffing recipes tend to call for 2 cups or more of broth, but I didn’t want this one too heavy and saturated so I just used one cup.

Transfer it to a greased casserole dish, cover, and bake for 27-30 minutes at 400F.

Remove the lid and allow it to cool for about 5-10 minutes if desired. It stays hot for a loooong time. I went upstairs, did some computer work, and came back 20 minutes later to still find warm stuffing! :)

What you’ll have is an incredibly light stuffing bursting with spring vegetables. The bread pieces on top remain a bit crusty, while the bread underneath gets really soft, saturated, and doughy.

Traditional stuffing usually gets a bad reputation for being one of the unhealthiest dishes at your dinner table. Well, now it doesn’t have to be any longer.
It’s actually so healthy, it makes a killer breakfast. I actually made this at 8:30am last week and inhaled a plate for breakfast…just throwing that out there!


Featuring all new, protein-packed salads, hearty toppers, flavour boosters, and dressings you'll want to drink, my new cookbook will transform the way you think about salads. Oh, and be sure to flip to the back for a surprise dessert chapter!

Lightened Up Spring Stuffing

Yield
5 to 6 cups
Prep time
Cook time
Total time
A lightened up stuffing that you can feel good about this spring. Many stuffing recipes tend to call for 2 cups or more broth, but I didn’t want this one too heavy and saturated so I just used one cup. Also, feel free to use frozen peas and edamame like I did. Just be sure to thaw overnight in the fridge and rinse and drain prior to use. I also suggest using a crusty seed & fruit bread from your local grocery or bakery. This type of bread will hold up much better in the recipe, as well as provide a light sweet flavour from the cranberries and raisins.
Ingredients
- 1 loaf crusty seed & cranberry raisin bread, roughly chopped into 1-inch pieces (5-6 cups packed)
- 1 tbsp extra virgin olive oil
- 3 garlic cloves, minced
- 1 cup peeled & finely chopped carrots
- 1 bunch asparagus, ends broken off and finely chopped
- 1 cup peas (if using frozen, thaw and drain first)
- 1 cup edamame (if using frozen, thaw and drain first)
- 2 tbsp fresh lemon juice
- 8-9 green onions, finely chopped
- 1/2 cup fresh minced parsley
- 2 tbsp fresh thyme
- 1/2 tsp dried oregano
- Herbamare (or salt) & ground black pepper, to taste
- 1 cup veggie broth or more if desired
Directions
- Roughly chop (or tear) bread into 1 inch chunks. Place the bread onto a baking sheet and in the (turned-off) oven overnight or for about 10-12 hours. This lets the bread firm up and get a bit hard so it retains its shape in the stuffing. If using frozen peas and edamame, place in fridge overnight to thaw. Rinse and drain before use.
- The next day, preheat oven to 400F and grease a 2.3 L/2.5 qt. casserole dish. Heat a large skillet or wok with 1 tbsp oil over medium heat. Add in the garlic, carrots, and asparagus and sauté until just tender, about 8 minutes or so. Season well.
- Now, add in the (drained) peas, edamame, fresh lemon juice, and green onions and sauté until heated through, about 5 minutes. Stir in the herbs and season again with Herbamare & pepper to taste. Remove from heat.
- Gently, stir in the cup of broth, being careful not to overmix the bread. Transfer to prepared dish, cover, and bake for 28-30 minutes. Carefully remove lid and allow to cool for 5 mins or so before serving.

Here’s little behind the scenes action for you, using my homemade photography board, diffuser, and props (herbs, burlap, and napkins). I’m also still loving Helene’s book. I highly recommend Plate to Pixel if you are getting serious about food photography. I’m trying to practice a ton in hopes that I will feel comfortable shooting all of my cookbook photography.

If you are looking for a main dish to serve the stuffing with, I suggest trying the amazing Lentil Walnut Loaf.
Coming up, a mini & portable chocolate peanut butter dessert that will blow ya mind.


Great recipe, Ange!
I’m so excited!! I’m FAMOUS! ;-) Looking forward to making this for Easter dinner with my family. Looks FESTIVE–just what I was looking for!
So glad you saw this post!!! :) I hope you like it…it’s my first time making anything like this, so hopefully it doesn’t disappoint.
Lovely! Good on you for ditchin’ the microwave, it is all around bad news. I always say- why wouldn’t you replace your microwave with a juicer?? It would do you a world of good.
This recipe looks absolutely delish! Thanks for sharing!
Hi Angela,
Found out about your blog through this recipe a few days ago. Did this one last night and everyone LOVED it, nothing left in the kiddos plates. Straight in the “Recipe to keep” binder.
Thank you
wow, kids love it too? Amazing!
oh yeah, my kids love food, all the food: From French (I am French, hubby is British) to chinese, japanese, mexican, indian… spicy or not, vegetables… deserts.. They loved your green monster smoothie the other day, I had not told them what was in it, they had to guess, but drank the lot in 2 min flat! Everything is homemade in our house, next step is to teach them how to cook, which they want to learn too.
The one problem: my older son (he’s 16) won’t touch raw veggies, so no salads, which is very annoying especially in the summer!
Made this today for a lunch potluck. I baked it this morning and it was still warm enough to eat at lunch, and it was a huge hit! I’m a grad student, so I had to take it with me to my morning class and torture myself and others with the amazing smell for 2 hours! I will definitely be making this again. Thanks!
Aw, I’m SO happy to hear that it was a hit! :)
What a great idea!! I’ve never tried to make stuffing since going gluten free…but I may just have to try this! Do you think it could hold up with a gluten free brand of bread?
I’m not sure Hannah, I haven’t really worked with any GF bread before so I’m not sure how it behaves. I would probably try looking online to see if anyone has done it already and it might give you a few ideas as to how it would behave.
This was my first time making stuffing. It was delicious! The next time, I think I’ll put some more veggies and less bread. The veggies were so flavorful on their own (even with dried parsley instead of fresh.) I used a white baguette.
Fantastic combo – I love cranberry raisin bread. Your photography is beautiful and your antiqued prop board turned out great
Thank you Susan!
Wow, this looks absolutely incredible. Stuffing is my absolute favorite Thanksgiving food… it never occured to me to enjoy it all year round. Definitely adding to my must-make list!
hope you enjoy it!
I’ve been looking for a recipe that I can finally try out asparagus with, and this might be it. You even added edamame to the dish. I’ll definitely bookmark this and try it out for this weekend.
Asparagus in stuffing! What a fantastic idea!
What is the best way to store leftovers? And could you make a day in advance? Looking forward to trying this one out on Thanksgiving!
I made this stuffing for Easter and it was a hit with both the meat-eaters and vegetarians! Thanks for the idea and I’m looking forward to the cookbook coming becoming available.
I enjoyed this recipe, however I think there might be different sizes of loafs. Mine had way too much bread and when making it again I would probably use half of amount of bread next time. Thank you for sharing these wonderful recipes!
Made this tonight using raisin/cranberry/pecan loaf. Didnt have time to dry out cubed bread, so toasted it briefly in the oven once it was cubed and let it dry out for a few hours afterwards. One word- Amazzzzzzzzzing! So delicious, came together perfectly. In the midst of the last of our winter weeks, spring was popping in my mouth. This will be a go-to for certain!
This is totally unrelated, but I just love your table in these photos!!
Did you build it yourselves? :)
Thank you! We purchased it from a local furniture store in Burlington, Ontario.
At what step do you add the bread? is it step 4?
Hi Michelle, yes – add the bread just before you pour in the broth. :)
Hi Angela,
Do you have a Thanksgiving stuffing with granny smith apples and stuffing?
I swore I printed it off your site last year, but now I can’t find it.
Thank you!
This looks delicious! I’m making it for an early Easter potluck.
But just a quick note: your description at the top of the recipe says “soy-free,” but the recipe calls for edamame, which are, of course, soybeans. You might consider either taking “soy-free” off the description, or indicating in the ingredient list something like, “optional – leave out if making soy-free” with the edamame listing to be more accurate – especially in case the soy-free part is a health/allergy necessity.
I made this for Easter for my family that loves everything that requires a stick of butter in the recipe and it was a huge hit! I didn’t have asparagus so substituted celery, yet it was still great. I bought Herbamare just for it, and that will definitely find its way into my other recipes. It was so delicious (and I look forward to finishing off the small amount of leftovers for breakfast). Great recipe!
So happy to ear it was a hit, Stephanie! Hope you had a happy Easter. :)