
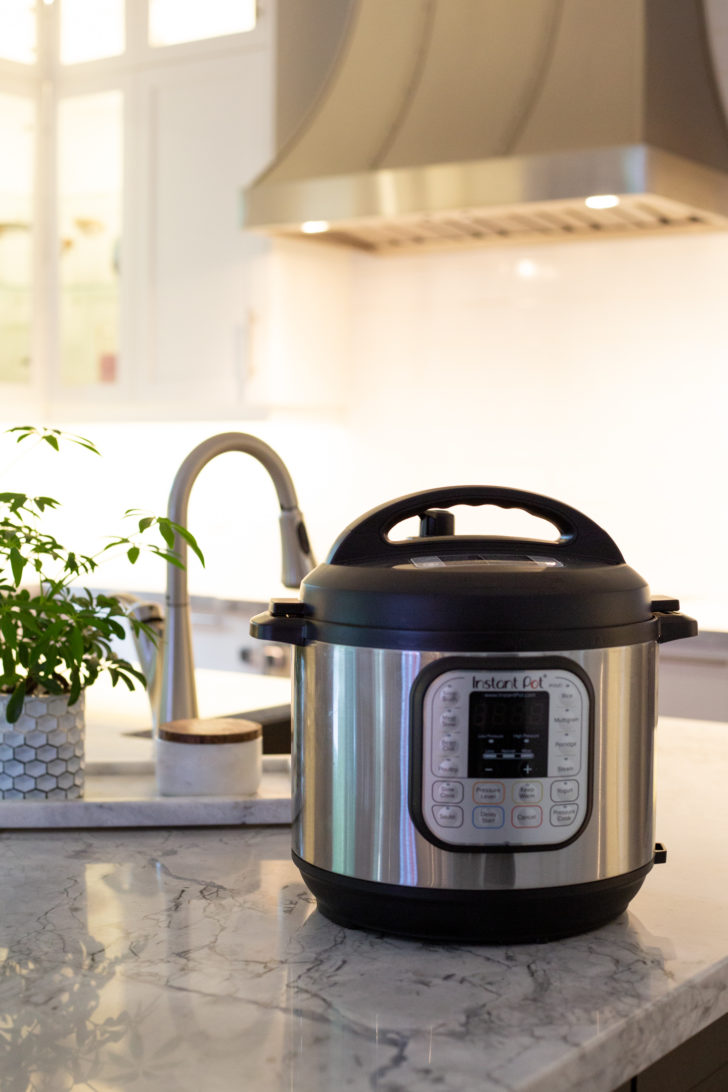
My very first vegan Instant Pot recipe is here! I finally took the plunge and purchased an Instant Pot after being on the fence about whether I wanted a new appliance to take up real estate on my counter (it would have to fight for space next to the kids’ piles of artwork, after all). Thanks again for the Ask Angela weigh-in back in February. I’m usually suspicious of new trends and like to wait a good while before I take the plunge, but I’m loooving it so far. I had totally underestimated how nice it is to put the lid on a recipe and walk away! But this same convenient feature also makes it challenging to develop recipes because you have ONE SHOT to get the cook time/pressure correct. No big deal. This curry took over 10 trials to get perfect…I changed up the flavours, cook time (6 minutes, 5 minutes, 1 minute, 4 minutes…ahh!), liquids-to-solids ratios…you name it, I tweaked it! Nicole and I love a challenge, though, so it’s been fun figuring it out and I do think we’ll get quicker as we go.
I had a stovetop pressure cooker back in the day and that thing used to scare the bejesus out of me with all of its rattling and clanking around. So the first two times I cooked with my new Instant Pot, I handed Eric a wooden spoon and instructed him to release the steam while I hid. I’m not proud, but hey, at least I’m now doing it myself! It’s really not that bad at all, and it feels so much safer than my old stovetop pressure cooker ever did.
Don’t worry if you don’t have an Instant Pot, though! I got yo’ back. We’ve tested this curry on the stovetop as well because I want everyone to be able to make these easy recipes at home! I haven’t had a chance to test this curry in a slow cooker yet, but if any of you do, could you please leave a comment and let us know how it goes? The beauty of this curry is that you literally throw everything (except the greens) into a pot, stir it, and cook. It couldn’t be easier! Of course, I wouldn’t call this an authentic Thai curry by any means, but it’s delicious and comes together quickly on those busy weeknights.
Anyway, if you have any questions about this recipe or the Instant Pot in general, please fire away below! If I can’t answer your question, maybe someone else can help by chiming in with their experience.


Featuring all new, protein-packed salads, hearty toppers, flavour boosters, and dressings you'll want to drink, my new cookbook will transform the way you think about salads. Oh, and be sure to flip to the back for a surprise dessert chapter!

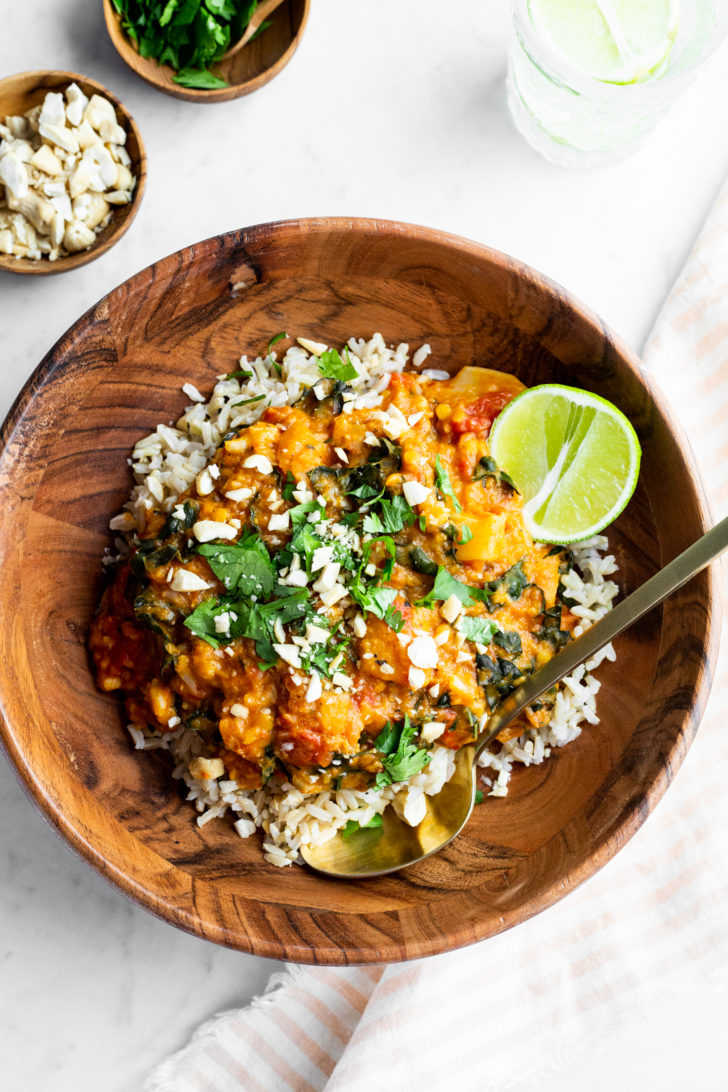
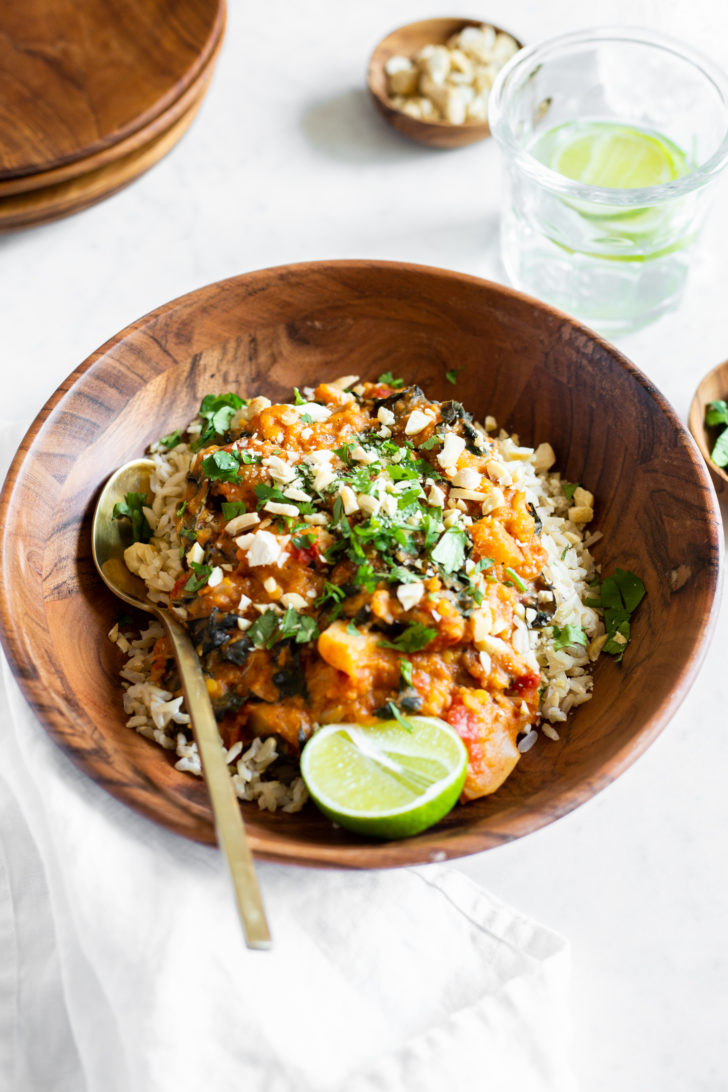
Instant Pot Cauliflower Thai Curry

Yield
5 1/2 cups (1.3 L) or 4 servings
Prep time
Cook time
Total time
I love the soft, stew-like texture of this spicy curry and how serving it over a cup of fluffy rice lends just the right amount of chewiness! This dish is one of those crave-worthy comfort foods that I reach for again and again. I created this recipe out of a need for more go-to pantry dinner options that take advantage of my speedy new Instant Pot electric pressure cooker. Not to worry if you don’t have one, though—follow my directions in the tip below to make this curry on the stovetop instead. It’s important to follow the Instant Pot directions carefully to avoid overcooking the veggies. This recipe's directions (steps 1 and 2) have been lightly edited as of January 10, 2018 to avoid some machines getting a burn notice. This recipe is adapted from my 8-Minute Pantry Dal.
Ingredients
For the curry:
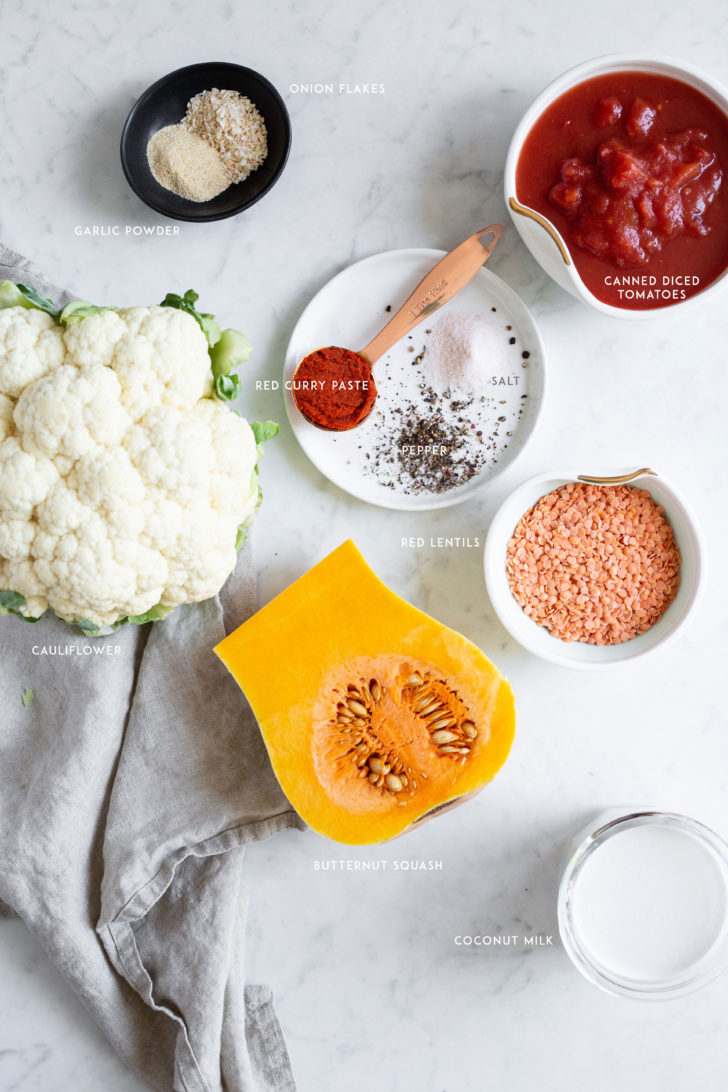
- 1 tablespoon (15 mL) extra-virgin olive oil
- 1 (14-ounce/398 mL) can light coconut milk
- 1 (14-ounce/398 mL) can diced tomatoes, with juices*
- 2 cups (260 g) chopped cauliflower florets (1-inch pieces)
- 2 cups (340 g) peeled and cubed (3/4-inch) butternut squash
- 2 tablespoons (30 mL) red curry paste**
- 1 teaspoon (5 mL) dried flaked onion***
- 1/2 teaspoon (2.5 mL) garlic powder
- 3/4 teaspoon fine sea salt, or to taste
- 1/4 teaspoon cayenne pepper
- Lots of freshly ground black pepper, to taste
- 1/2 cup (100 g) uncooked red lentils
- 2 cups (75 g) packed stemmed and finely chopped kale or chard
Serving suggestions:
- Cooked jasmine rice or grain of choice
- Fresh chopped cilantro leaves
- Fresh lime juice
Directions
- Add all of the curry ingredients (except the red lentils and kale/chard) to the Instant Pot and stir until combined.
- Add the red lentils on top of the mixture and gently press them into the liquid (do not stir the lentils into the mixture as this can result in a burn notice in some machines).
- Secure lid in the lock position and check that the Steam Release Handle is pointing to the “Sealing” position.
- Press the “Pressure Cook” button (or “Manual”, on some machines) and set the cook time to 5 minutes on high pressure. After 5 seconds you’ll hear a couple beeps and the screen will say “on”. The cooking process has begun! You can now go do something fun for about 10 to 15 minutes while the curry cooks.
- You’ll hear a few beeps when the timer is up. Immediately do a “Quick Pressure Release” to avoid overcooking the curry. I stand back and use a wooden spoon handle (never my hand!) to shift the Steam Release Handle to the “Venting” position to release the pressure. Once all of the pressure has been released, the float valve will sink and you won’t hear steam anymore.
- Carefully open the lid and stir the curry. To achieve a thicker texture, I like to mash a bit of the curry with a potato masher, simply pulsing about 4 or 5 times around the pot. You can also blitz it for a second or two with an immersion blender.
- Stir in the chopped greens until thoroughly combined and secure the lid. Set the Instant Pot to the “Keep Warm” setting and allow the greens to wilt for about 5 minutes in the curry. Press “Cancel” to turn the heat off and release the steam again, if necessary, before removing the lid.
- Serve over rice or grain of choice, if desired, and garnish with cilantro and lime. The lime juice gives it a lovely brightness, but avoid using too much as it can overpower. I always add a sprinkle of salt and pepper before serving too.
Tip:
* The canned diced tomatoes that I use are quite "soupy" and liquid-y. If your can seems to be on the low end of the liquid content, I would recommend adding a 1/2 cup of water to this recipe before cooking.
** I love this Thai Kitchen Red Curry Paste—it’s shelf stable and comes in a small glass jar. You can often find it in the international cuisine aisle of grocery chains.
*** Dried flaked onion is less concentrated than onion powder. Onion powder will work as a substitute if that's what you have on hand, but I would suggest using a smaller amount (around 1/2 teaspoon) as it’s more flavourful.
STOVETOP OPTION: Not to worry if you don't have an Instant Pot as this recipe works great on the stovetop too. Simply add all of the ingredients except the kale (or chard, if using) to a large pot, stir, and bring to a low boil over medium-high heat. Reduce the heat to medium-low and simmer, covered, for 25 to 35 minutes (adding the kale/chard during the last 10 minutes), until the veggies and lentils are tender. Stir the curry every 5 minutes while cooking, and reduce the heat if necessary to prevent it sticking to the pot. Follow directions #5 and #7.
Note: Cauliflower amount has been changed from 2 1/2 cups to 2 cups as of Sept. 25/18.
Nutrition Information
(click to expand)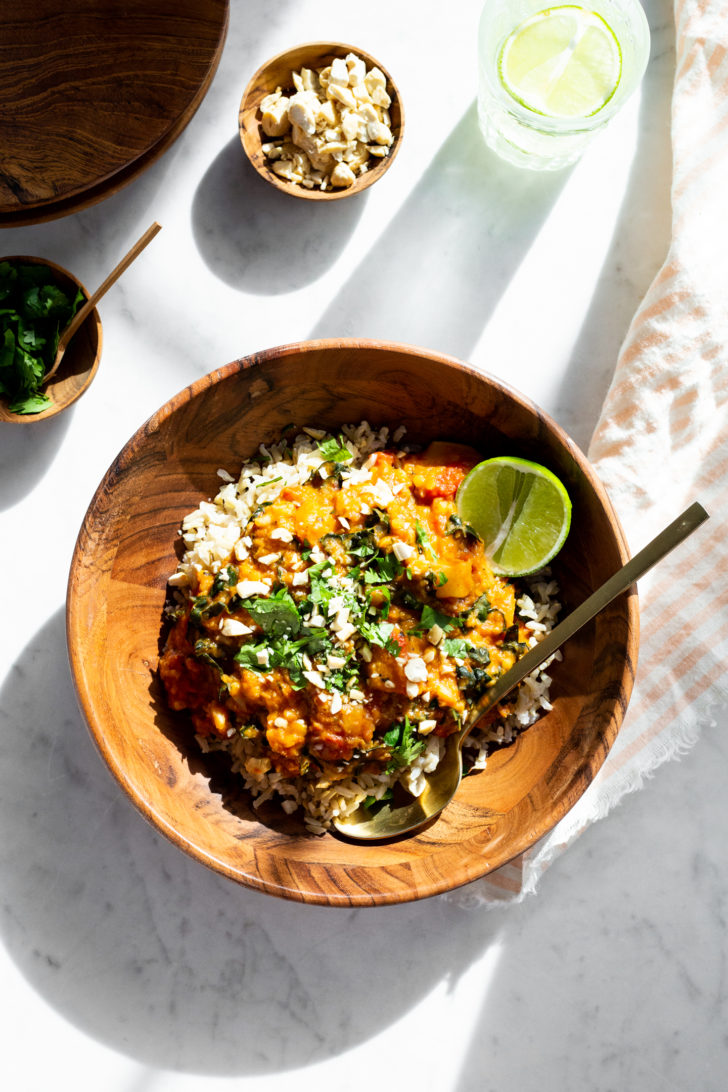


This recipe was AWESOME. It took me about seven minutes to have everything prepped and thrown in the Instant Pot, and I bought the frozen microwaveable rice at Trader Joe’s…so this made the perfect quick work night meal. Unfortunately – my Instant Pot literally broke and wouldn’t cook the curry! I just dumped everything in a pot on the stove and simmered it for maybe 25-30 minutes, adding the kale in during the last five minutes. Still turned out great! What an awesome recipe!
I’m so happy you love it so much :) Thanks so much for the review. What do you think happened to your Instant Pot? So sorry to hear that!
I have not had much luck previously with my 2-year old Instant Pot, and I haven’t used it in more than a year, but this recipe inspired me to drag it out of my pantry again. I was so excited to make this that I totally forgot why I stopped using it in the first place- at least 50% of the time I try to use it, it starts counting down but never comes to pressure. I’ve used it maybe a total of 10 times since I bought it.
I tweaked the recipe to use fresh onion, garlic and ginger, sauteing them first to make it more flavorful, and then adding the other ingredients. I even remembered, by some miracle, that tomatoes can cause scorching, so I stirred everything up before adding them carefully on top and did not stir after adding. Well, same problem I’ve always had occurred, I tried three times and all three times it started counting down but never came to pressure. I finally dumped the contents into a soup pot to cook on the stove and sure enough, my instant pot insert was totally scorched on the bottom. Frustrating, but I’m guessing this might be why you used onion flakes and garlic powder?
I really hate the stupid Instant Pot. It’s so frustrating to have multiple dinners take hours to make when the thing is supposed to be *saving* you time, and end up having to finish them on the stovetop anyway. I don’t know if mine is just faulty or if it’s a problem with the way I insist on cooking (which is pretty standard)- I won’t start a recipe without sauteing some fresh aromatic ingredients. Sauteing first seems like that is a no-go for the Instant Pot. I think it might just not be for me, or maybe I can simply use it to cook dried beans and nothing else (I don’t even like the way rice comes out when cooked in the Instant Pot unfortunately- too mushy and sticky generally).
The recipe came out great on the stovetop by the way. I added some seitan for protein, mango chunks, and used bok choy for greens, as well as the fresh onion, garlic and ginger I mentioned. Delicious over some jasmine rice.
Hi Amy, Oh man it sounds like your IP is a huge thorn in your side!! What a drag for sure. I’ve read that it’s very common for recipes to use the saute function beforehand so I wouldn’t think that is the problem. I didn’t use fresh because I was going the ultra-simple route with this recipe. :) and I haven’t tried it with fresh garlic and onion yet. I wonder is it is something faulty going on with your IP? Have you tried reaching out to them? Instant Pot also has a huge Facebook page (with over a million fans I think!) and I think you could try reaching out with your issue…I’m sure someone would be able to help! I’ve heard sometimes the inner ring can cause issues if it’s not secured properly…also be sure to check that the valve is set to sealing while cooking so the steam doesn’t escape (which I’m sure you already are, but worth mentioning!).
Contact the company! Your IP shouldn’t do what you’re saying! Sauteing first is okay unless something gets stuck to the bottom. Make sure to deglaze with some water before putting the rest in.
Thank you, thank youuuuu for finally buying an instant pot and for creating amazing recipes for us! I’ve had one for a few years and it’s by far my favourite kitchen appliance, and I’ve been wishing for IP recipes from you!
This curry was fantastic, came together so fast (especially using frozen cauliflower and butternut squash). The most amazing part was my very picky 3.5 year old gobbled it all up and didn’t complain once!! Thank you, I’m so looking forward for more of your IP recipes :D
Hey Nicole, I’m so happy you and your fam enjoyed the curry! I love your idea of using frozen cauliflower and butternut squash too…we’re all about those time-saving tips in our house as well ;) Thanks for your support!
This recipe looks really good! I think I’ll just add some jalapenos and maybe some cheese? I’m not sure yet, I’ll figure that out when I make this for lunch, thank you!
Hey Bryan, I like your idea of adding an extra kick with the jalapeños! I’d love to hear how it goes if you try the curry.
Thanks for the IP inspiration! This turned out GREAT and easy with pre-sliced squash and cauliflower (thank you also for the red curry paste help – I was looking this up in the grocery aisle and found the exact one). I guess I was somehow expecting more of a soupy, Thai-style curry. What would you add/tweak to get that texture?
Hey Katie, so glad to hear you enjoyed it! :) By soupy, do you mean thicker or thinner consistency? :) If you want it thinner, I would add more liquid next time (or even after cooking). If thicker, I really recommend the mashing or quick immersion blender blitzing step…makes it so thick and creamy. Not sure if this helps but please let me know!
I have made this recipe twice now, and the flavours are absolutely amazing. I love it. However, both times, I get the dreaded “burn” message on the instant pot. I am not sure what I am doing wrong? Any ideas? I follow the recipe to the letter, except use a bigger can of tomatoes. Thanks a bunch!
Hi Miep, I’m so sorry to hear that! We didn’t experience any burn notices (nor did my tester Nicole), but I’ve heard that it can happen if the liquids-to-solids ratio isn’t right. Did you make any changes to the recipe? Here are some things I was thinking about which could impact the moisture content: Did you add the water in the canned tomatoes (they shouldn’t be drained)? My canned tomatoes were quite “soupy” and liquid-y so I wonder if cans that don’t have as much water may need a boost with added water. Was your cauliflower or butternut squash dried out by chance (which could make the veggies absorb more liquid)? Did you use full-fat coconut cream instead of light (full-fat has less water)? Also, I’ve heard the inner ring not being secured properly or the machine size can sometimes impact the outcome of a recipe so I’m wondering which model you are using. If you didn’t change anything, I would try adding water next time – maybe 1 cup – (and adjusting the seasonings to taste after cooking). I also read that putting the liquids in the pot first, and adding the veggies last on the top and gently pressing them into the mixture can help. I’d love to hear how it goes if you do try it again. :)
This was my first real Instant Pot recipe and first veggie curry recipe and I’M IN LOVE WITH THIS CURRY!! I made it last week and I’m about to go to the store to get more cauliflower (and other items) and make it again today! This is definitely one of my new go-to recipes! I ate it with spiral zucchini – amazing! I’ve told many people about it and they probably think I’m crazy but I love it THAT MUCH!! Thank you for the recipe!!
Hey Diane, aww your comment made my day!! Thank you SO much for your feedback and enthusiasm for this recipe. It makes me so happy to hear this. And I really appreciate you spreading the word about it too. :) Happy IP-cooking!
Can you recommend an alternative to coconut milk as it does not agree with me? I LOVE curries but suffer after I indulge myself so trying to figure out how to enjoy the curry flavor and texture but without coconut. I’m GF and DF but drink soy, almond and other nut milks. Thank you!!
Hey Lisa, Oh that’s tricky for sure…I wonder if a creamy nut-based milk might work? I really love Califia brand of almond milks as they are very creamy. Maybe the unsweetened and unflavoured (aka: no vanilla) might be nice? Another option, might be a mix of veggie broth and cashew cream. I would add the cashew cream at the end of cooking probably. I’d love to hear if you try anything out!
Great recipes! Love this food blog
I recommend NOT adding the lentils first (not sure why I thought it was a good idea), because it will burn. I’m en experienced instant pot and electric pressure cooker user, but I somehow burned it. It was too full with all the ingredients and I couldn’t stir it properly, but it was still delicious when I ended up cooking it in a pot!
I also used fresh onion and garlic, sautéing it in the instant pot before deglazing the pot and it was good, minus the whole burning situation. I’m still willing to give it another chance though!
Hey Alice, I will note to add the liquids first in the recipe now (I always do this but didn’t know if it was important after instructing to stir). I’m so glad you tried using fresh onion and garlic…can’t wait to try this!
We made this with tatsoi since we had that instead of the kale/chard and it was very good. My husband accidentally put it in in the beginning so it was very small once the recipe was done but still good. Thanks for the awesome recipe.
Hi Lauren, So glad you both loved it! Thanks so much for trying it out.
This is so yummy !! This was my first time using an instant pot and it came together so quickly. I followed your tip to use a potatoe masher and it thickened it up nicely. Will definitely be adding this to the favourites for a nice quick weeknight dinner. Froze the extra cauliflower and squash for next time.
Hi Jody, I’m so glad to hear it was such a hit! Thank you so much for your feedback. :)
Hi Angela: I wanted to reach out to you about my situation. I’m on a food plan where, for example, I eat 1 protein, 1 grain and 1 fruit for breakfast. I also can no longer eat flour or sugar of any kind. Prior to starting this food plan I was cooking your recipes. I have both of your cookbooks and just love your recipes! I started trying to convert a couple of your recipes in order to determine how many grains, proteins, fats, fruits or vegys is in a serving. I’m finding it very challenging and wanted to see if I could get some advice from you that would make this a little easier. For example I converted your nutty granola recipe. However, I want to lessen the amount of protein and fat per serving so I can have almond milk with it and eat it like cereal. Since you have been doing something similar to this with recipes. This would mean the world to me as I would like to continue to enjoy your recipes but in a way that works for my body. I really appreciate you taking the time to consider my request. :) PS I hope this wasn’t too confusing to understand.
Hi Julie, Wow that sounds challenging for sure! As for calculating nutritional info, all of the recipes in my app (around 150) have nutritional info in the tips section now, and my second cookbook also has it available online. That might be helpful for you, but I’m not sure.
I don’t even know how I came across this recipe, but I’m so glad I did. I made it tonight with a few tweaks to suit my low carb lifestyle. This was so good, I had seconds. My tweaks were I used ghee and butter instead of olive oil, and a fair amount. My tomatoes were fire roasted. I didn’t use lentils or rice but increased the butternut squash. Next time I’ll increase the greens too. I used massaman curry paste instead of red curry. I used a pressure cooker instead of an instant pot. This recipe was very quick to make especially if you get pre-cut squash. Thanks for a fantastic recipe!
Hi Maha, I’m so glad it was such a hit! I love all of your tweaks…thanks for sharing :)
***IP TIPS***
hopefully these are helpful for instant pot users
-the lid is made to stand vertically on the side of the ip.
the handles on the sides of the ip have holes in them to fit the piece of plastic
protruding from the ip lid. tilt the lid vertically and insert into hole in handle. voila!
-when releasing the pressure valve, place the clear plastic measuring upside down over
the valve to capture the steam when releasing.
YOU CAN BAKE CAKES IN THIS THING TOO!
Hi Angela;
Just curious if this is a sponsored post by IP? Your disclaimer on your website where you used to say you do not do those seems to have disappeared (or was moved?). Thanks for clarifying!
Hi Sophie, Thanks for your question! I actually don’t do sponsored content (I tried it once in the past, wasn’t for me) so this is definitely not sponsored…and if I did I would let you know at the top of the post. :) I hope this helps!
First off, can I tell you how excited I am that you bought an Instant Pot?! I just bought one a couple of weeks ago and am having fun trying it out. Looking forward to seeing more of your recipes.
Unfortunately, I followed this recipe (no substitutions) and received the burn message twice. Both times, I just scraped whatever was stuck on the bottom of the pot and then resealed it. I was thinking I’d have to finish cooking it on the stove but I didn’t receive a third burn message so kept going with it.
The curry was delicious! I wonder if I just need to grease the pot better next time?
Anyway, thank you for another great recipe! And Happy Thanksgiving. :)
Hey Josie, That’s too funny because I get excited when I hear that my readers have an Instant Pot! It’s almost like a green light to create new IP recipes, lol.
I’m so sorry you got a burn notice! I’ve had a few other readers say they had one and it’s been so puzzling. From what I’ve read online this can happen if the lid’s inner seal isn’t on properly or if the dry ingredients are added first. I always add the liquids first so the red lentils don’t hover on the bottom, if that makes sense. Another option might be to simply add a bit more liquid. If your veggies are drier than usual, they could be absorbing more liquids as they cook.
I’ve heard that a burn notice can happen if the liquids-to-solids ratio isn’t right. Did you make any changes to the recipe? Here are some things I was thinking about which could impact the moisture content: Did you add the water in the canned tomatoes (they shouldn’t be drained)? My canned tomatoes were quite “soupy” and liquid-y so I wonder if cans that don’t have as much water may need a boost with added water. Was your cauliflower or butternut squash dried out by chance (which could make the veggies absorb more liquid)? Did you use full-fat coconut cream instead of light (full-fat has less water)? Also, I’ve heard the inner ring not being secured properly or the machine size can sometimes impact the outcome of a recipe so I’m wondering which model you are using. Sorry for all the questions…from what I’ve read there are many variables that can cause this so it helps to troubleshoot. Either way, I’m so happy you loved the curry in the end!
I’d love to hear how it goes if you try it again! :)
Loved this! Made it with sweet potato in my off-brand multicooker because my butternut squash went bad. Turned out great!
I have been looking for a recipe like this. Thank you ?. My husband will LOVE this?. So nutritious too??.
Aww thanks Amy!
This was so so so delicious and so so so easy! I even bought the already cubed butternut squash to save time. My only request is that you share more instapot recipes, please!
haha thanks Leah…I’ll sure try!
Great recipe! I was a bit worried because I used green curry paste instead of red, but it was still delicious ?
That’s so great to know, Bri!