

It’s the day after the American Thanksgiving and I’m sure the last thing anyone wants is an energy bar.
However, it’s also Black Friday in the US and I figured maybe you could use some energy after all! There is very little that could pull me out of bed at midnight to enter long, cold line ups for hours on end, but these bars could just about do it.
I actually whipped up these bars because we’re leaving on a vacation tomorrow. I always like to bring some type of energy bar with me when I go away and stash a couple in my purse when we’re out walking around. If I find myself without any vegan options, I have a bar that will hold me over until my next meal.

I’ve never made an energy bar quite like this before. I added protein powder to rev up the protein in these bars, making sure they would give me sustainable energy when out and about. I wasn’t really sure what they would taste like with 1/2 cup of protein powder, but I was pleasantly surprised by the outcome!
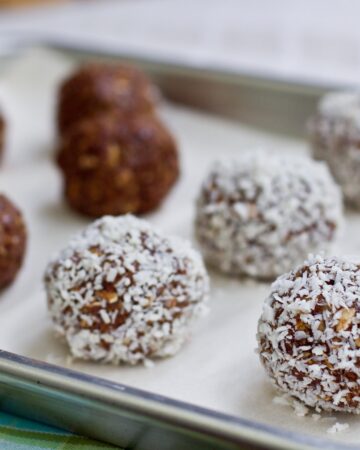
I made two batches, on the left, using 1/4 cup protein powder and on the right, using 1/2 cup protein powder.


The bars using 1/2 cup protein powder were a bit more dense and the batter was drier, but otherwise I didn’t notice much of a difference taste-wise. Eric tried the bar on the left and he said he couldn’t even detect the protein powder at all. My suggestion is to use a very mild-tasting protein powder. I loved using Garden of Life Brown Rice Protein Powder as it has a fairly neutral taste and it’s not sweetened. Just make sure whichever protein powder you use, it tastes good because you will taste it in the bars if it has an “off” flavour. Of course, you could also skip the protein powder all together if you prefer.
If you cut 10 bars out of the batch, each bar has about 8 grams of protein when using protein powder such as this one below (17 grams protein per scoop).

These no-bake bars take just 5 minutes to throw together…love that.

I added a very THIN layer of melted chocolate on top of the bars and then chilled them in the freezer for 10 mins.

I also made these nut-free, using the amazing Sunbutter sunflower seed butter! I found it at Whole Foods and it’s almost an exact knock-off of Trader Joe’s sunflower seed butter (or maybe TJ’s is a knock-off of this stuff!). Either way, it’s amazing stuff. If you haven’t tried lightly sweetened sunflower seed butter, you really must. It’s ultra drippy and smooth.

Feel free to use any kind of seed or nut butter you prefer, but if it’s not very drippy you will probably have to add a bit more syrup. I also tried the bars (batch #2) using almond butter and it was also good, but I still preferred the sunflower seed butter.

[print_this]
Last Minute Protein Energy Bars
(nut-free with gluten-free option)
Yield: 10 bars
Ingredients:
- 1 cup rolled oats
- 1 cup brown rice crisp cereal
- 1/4-1/2 cup protein powder* see note
- 1/2 tsp ground cinnamon
- pinch of salt
- 1/2 cup brown rice syrup*
- 1/2 cup sunflower seed butter* (lightly sweetened like Trader Joe’s or Sunbutter)
- 2 tsp vanilla extract
- 1/3 cup dark chocolate chips, melted
1. In a large bowl, mix together the dry ingredients (oats, rice crisp, protein powder, cinnamon, salt).
2. In a medium-sized bowl, mix together the brown rice syrup and seed butter. Heat in microwave for 45 seconds and stir in the vanilla extract.
3. Pour the wet mixture on top and mix very well with a spoon. The batter will be dry if you used the protein powder, so you might have to get in there with your hands and squeeze the dough together.
4. Press into a pan (with lightly wet fingers) and roll it out smooth with a pastry roller (optional). Melt chocolate in microwave and spread on top of the bars in a very thin layer.
5. Freeze for 10 mins. and cut into bars. Store in the fridge or freezer.
Notes: 1) Make sure to use a mild and good-tasting protein powder as the taste will really come through in these bars. 2) Feel free to use nut butters like almond or peanut butter as a sub for the sunflower seed butter, but make sure they are drippy or you will need to add more syrup. 3) Feel free to substitute honey for brown rice syrup as they both act well as a binder. I do not think maple syrup or agave would hold them together that well. 4) Gluten-free option: use GF certified oats, protein powder, and rice crisp cereal and double check all other ingredients for possible contamination.
Approximate Nutritional info: (for 10 bars, without chocolate, using Garden of Life protein powder): 175 kcals, 7 grams fat, 24 grams carbs, 1 gram fibre, 10 grams sugar, 8 grams protein.
(for 10 bars, with 1/3 cup chocolate, using Garden of Life powder): 199 kcals, 8 grams fat, 27 grams carbs, 1 gram fibre, 13 grams sugar, 8 grams protein.
[/print_this]

A couple weeks ago, I bought this new Holly Nog (vegan egg nog) that I picked up at Loblaws. It’s just 60 calories per serving and has a simple ingredient list. I’m really impressed by the flavour of this nog…it’s amazing! The only thing it’s lacking is a really creamy texture, but for 60 calories a serving I figured I could work with it to make it into the nog I dreamed it would be…


(click to enlarge)
I blended a half cup of Holly nog, 1/2 cup almond breeze, a frozen banana, nutmeg, and cinnamon and I was absolutely blown away by the outcome. It was exactly the texture I was looking for with the wonderful nog flavour that I love so much!
This is what a picture looks like when the drink is SO good, I can’t even wait to snap the photo!

I can’t control myself around this stuff. A proper photoshoot will likely never happen. This is as good as it gets.
Oh wait, I just remembered I did take a photo of it a couple weeks ago! Here it is…before guzzling!

Creamy Holly Nog Smoothie
Yield: 1 serving
- 1/2 cup Holly nog (or try coconut milk nog)
- 1/2 cup almond breeze
- 1 peeled and frozen banana
- 1/4-1/2 tsp ground nutmeg (to taste)
- 1/2 tsp cinnamon, or to taste
1. Blend and enjoy!
~~~
Updates:
In case some of you didn’t see all my crazy updates/messages/panic attack yesterday, I found a discrepancy in my gluten-free pie crust recipe (thanks to Jesica for letting me know!). I said to pre-bake the crust at 350F and 425F, when it should be 350F and NOT 425F. Please accept my apology! I felt so horrible all day yesterday. The recipe is now updated to reflect 350F. I will be quadruple-checking my recipes from now on…
I’ll be back this weekend with photo clues of where we are travelling…I’m excited to see if some of you will be able to guess it right away. I might have to make it challenging.
Up, up, and away…


Just made these Protein bars! I subbed in Chocolate Whey Protein Powder (all we had in the pantry), and I made my own sunflower seed butter (just put roasted, UNSALTED sunflower seeds in the food processor till smooth). These turned out DELICIOUS! I also added in 1 TBSP of cocoa just to amp up the cocoa flavor. The husband had no clue there was chocolate in them, they are just GOOD! Looking forward to taking these bars to work (and to class!) this week! Thanks!
Angela,
These protein bars are amazing!! My husband rarely eats anything that he knows is vegan or healthy in any way…but he LOVES these!! Thanks for posting!!!
i am so making the nog thing!!
I saw “flax egg” in some recipes. If I want to replace it with egg white, how many of them can be replaced with 1 flax egg (1 tbsp ground flax + 3 tbsp water)?? Thanks!
These look great, but will the bars hold together just as well without the chocolate? I don’t really like the taste of chocolate by itself so would prefer to leave it out. By the way, literally every recipe I’ve tried from your website has come out perfectly the first time. Sometimes I’ve wanted to make a few flavour tweaks (like next time I’ll make the ultra fudgy brownies, brownies being the one place I do like chocolate, a bit sweeter) but they’ve always been fun to make, come out perfectly and liked by everyone who tries them.
Yes I think they would hold together fine :)
Ahhh. No wonder the crust burned!!! It still tasted great, though:)
I’m sorry about that Laura!
Loved the holiday nog recipe!! I couldn’t believe how good the soy egg nog tasted especially with only 60 calories per cup. The shake was delicious and healthy, great job as always!
I made these and omitted the cinnamon and protein powder then I used peanut butter and added peanuts! It was to die for!!!!!!
Just made a batch! Modifications: puffed millet cereal instead of rice, peanut butter instead of sunbutter, and three mashed bananas instead of brown rice syrup. Peanut butter, chocolate, and banana is an amazing combo. Thanks for the simple and adaptable recipe.
So delicious! I made a batch of these energy bars to take to Science Camp… I hope they make it until tomorrow when we leave!
Oh my gosh, that eggnog smoothie sounds SO GOOD! I hope they sell Holly Nog at my local store!
Wow! Great bars!!! Even my picky 10 y.o. loved them.
I used Nuts To You brand sunbutter, but it’s a bit thicker than the brand you used, I think I’ll hit SuperStore for the other brand next time. Worked out very well, with 1/4 c hemp powder. For the topping I used the 1/3 c chocolate chips with 1Tbs sunbutter melted in with it.
You didn’t state pan size? I used a 9×9 pan, and cut into 16 smallish squares.
I think I used both an 8″ one time and the next time a 9″, either is good! Glad you liked them!
Do you think home made jam would stick to these bars or is there a way to incorporate it into the recipe? I would love to make my own blueberry bliss luna bar.
hmmm Maybe you could stir a bit of jam into the batter before spreading it into the pan?
That looks SO good! :)
Have been making the protein bars and they are hit!
I substituted Coconut Nectar for the brown rice syrup. http://www.naturalnews.com/030110_coconut_nectar_vinegar.html
It was a great binder and keep the bars super tasty. Coconut Nectar is a good low-glycemic alternative.
Thanks for sharing such a wonderful recipe!
Stephanie
Hi Angela,
Have been following your blog for some time now and it’s been awesome for getting my health back in order. I’m leaving for vacation soon and these bars would be a huge help to me particularly since I have difficulty maintaining my healthy eating habits when fresh fruits and veggies aren’t always attainable. I was just wondering, if I left out the protein powder (prefer to) would it be ok if I added shredded coconut, slivered almonds or sunflower seeds and chia seeds?
Thanks again!
I can’t see why not! Just make sure the batter doesn’t get too dry or it may not hold together. happy vacationing!
Yum – these look great! & I just picked up sunflower butter from Trader Joes today!! Love that stuff!
Will these turn soft if they are kept at room temperature? I would like to make them for my son’s school snack?
I brought them on a trip with me and while they bent a bit in my bag, they stayed intact and were quite portable. Enjoy!
Just made the bars (and ate one!) They are wonderful – thank you for the recipe!
I made these last night, and they are so yummy! I used 1/4 cup protein powder, but next time I will try 1/2 cup. I cannot taste it at all, but I was worried that I would. These are so easy to make!