Hey everyone! It’s Eric – Angela’s husband. I’ve hijacked the blog to try and make a name for myself once again. Some of you may remember my last blog hijacking post in 2009…it wasn’t pretty. Angela has been asking me to do some guest photography posts and I usually forget how to do it by the time I get around to typing up a post. I just recently learned about the Microsoft Photosynth application, so I figured I might as well do a tutorial as I learn how to do it myself.
This tutorial is for a PC only. Sorry I’m not a Mac guy and don’t have plans to cross over to the dark side any time soon. But you Mac people aren’t at a total loss! If you haven’t already, check out the Photosynth app; you can accomplish pretty much the same stuff we are doing right from your iPhone or iPad.
If it’s not obvious, I’m not a professional, so the advice I’m giving is just from reading up on it and what I’ve learned through trial and error. I’m sure there may be more professional ways to get better results, so use this as a loose guide to get started.
Here is the end result we are looking for. This is my first attempt at a full 360 panoramic image in JPEG form (you can click to enlarge):

While the JPEG image above looks neat, you get a much better feel for the space when you upload to Microsoft Photosynth (see below). You will need the Microsoft Silverlight plug-in to view this image. From there, drag and click up, down, and across.
To start it all off, we’ll need to go over some steps for setting up your camera. While a DSLR is not required, I recommend a camera that has a manual mode (for example, some newer point-and-shoot cameras have a manual mode setting). I’m not going to get into the nitty gritty of how to change your camera settings since each has its own way.
How to setup your camera for panoramic shooting:
1) Set ISO to be as low as possible for the least amount of noise in the photo. If it the images are too dark you can go up to ISO 400 (depending on the quality of camera). Generally, the higher the ISO, the more noise or grain in the photos. Make sure you do not change the ISO setting while taking photos for the 360.
2) Meter your shot. In other words, metering your shot is to find the average shutter speed required for the 360. In AV Mode, set your camera aperture to 11. Now, take some pictures where you want to do the panorama in both the bright and dark areas. Keep an eye on what the shutter speed gets set to on each shot, and try to figure out the average as this will be used in step 3. For example, if the shutter speed is 60 in the dark areas and 400 in the light areas, your average shutter speed for the 360 will need to be set to around 200.
Note: The reason for setting the camera aperture to 11 is because we want both the foreground and background in focus.
3) Set your camera to manual ‘M’ mode. Change the aperture to 11 and set the shutter speed to the average speed you figured out in step 2.
4) Disable Automatic focus on your lens. This is so images will not have different focus levels which can cause stitching to look bad.
5) Set your white balance on your camera for the condition you are in. Do not change the white balance setting between photos.
6) Set your camera to shoot in RAW. While not absolutely necessary, it is recommended so you can correct the white balance and do further editing without compromising the quality.
Also Note, shooting the 360 panorama is best with a fixed lens instead of a zoom lens. If you do not have a fixed lens be sure you don’t zoom in/out as you are moving the camera around while taking pictures.
Now we’re ready to start shooting. Don’t turn the camera off between pictures as it may revert to default settings when you turn it back on.
How to shoot a panoramic picture:
1) Use a tripod. The reason for this is to reduce camera shake. You really need the pictures to be crisp in order to stich them together nicely. Shooting at aperture 11 will generally make the images quite dark and you will need a longer shutter speed to make up for it making a steady tripod necessary. It only takes 1 blurry picture to screw up your 360 panorama and it’s just not worth it when you’re taking 100+ photos.
Depending on how perfect you want your 360 panorama, you might want to read up on parallax error. Basically, if you don’t pivot your camera around the optical center of the lens you can end up with stitches that don’t line up perfectly due to shots having different perspectives (this article had a good description of it half way down). There are different tripod heads (some very expensive) that can make this entire process really easy on you. Unfortunately I don’t have one so I can’t recommend one yet. If you want to make sure your panorama is perfect – read this – there is a formula for finding out how you need to move the lens and how many photos it will take. Additionally if you’re lazy and have a boat load of money you can always get a computerized tripod head which takes all the work away from you.
To be honest, I didn’t even know what parallax error meant until I started writing this tutorial. I’m still happy with my result though. I guess I got lucky because I didn’t have too many objects in the foreground. The point is, don’t be scared to try it with what you have (or don’t have) – you might be surprised by your result.

2) Start shooting. Start with the camera pointing completely to the ground and take your first picture. Now tilt the camera up vertically a small amount keeping at least 1/3 of the picture in overlap and take another picture. Keep doing this until you have the camera shooting completely up in sky.
3) Now rotate the camera horizontally a little (keeping the overlap with your last sky picture), and start shooting pictures as you change the vertical angle of the camera from pointing to the sky back to the ground. You’ll want to keep in mind that you want at least 1/3 overlap in the photos when you are shooting completely horizontally across. Changing your angle too high will give you a blank slit in your picture (like I did on the Sherman Falls Photosynth).
4) Keep repeating steps 2 & 3 until you’ve done a complete 360. I created the 360 panorama of Sherman falls with 125 photos. I was just doing everything by eye ball and had a couple small gaps in the final result. I was shooting with a 28mm lens and changing the horizontal rotation by approx. 20 degrees each time.
5) And Finally, if you don’t want the tripod base in your picture, take the camera off the tripod and shoot completely down in the exact position you had the camera when it was attached to the tripod (try not to get your feet in the photo).
Now that you’ve taken your 100+, 200+ or 400+ images (depending on your lens, the higher zoom the lens the more photos you will have). The higher zoom will also get you a higher quality panorama as well. Hopefully you haven’t bored the person too much who is waiting for you – Sorry Ange!
If you took your photos in RAW format you can make adjustments to the white balance as you see fit using editing software (we use Adobe Lightroom). Just make sure the same settings are applied to all photos of the series – I had to do this on mine as I overexposed part of the image since I didn’t choose the best average shutter speed. I’m not going to explain how this is done since there are many different software that do this and depending on what you have it may be different. If you don’t have anything yet I recommend Adobe Lightroom. It’s very easy to get the hang of.
Now it is time to install the software you will need.
1) Install Microsoft ICE (Image Composite Editor) software on your PC obtained from here (http://research.microsoft.com/en-us/um/redmond/groups/ivm/ice/).
2) Install Microsoft Photosynth obtained from here – (http://photosynth.net/create.aspx). You will need a Windows Live ID in order to upload your Photosynth file and share it with others. It is free to get an ID so you might as well do this now.
While I’m on Microsoft software, they have the Microsoft Camera Codec Pack. If you have a 64 bit version of Windows Vista or 7 and hate how Canon doesn’t have a driver so you can see your RAW (CS2) files in windows explorer, install the Microsoft Camera Codec Pack, you’ll be able to see them all in explorer (and Microsoft photo gallery) after a reboot.
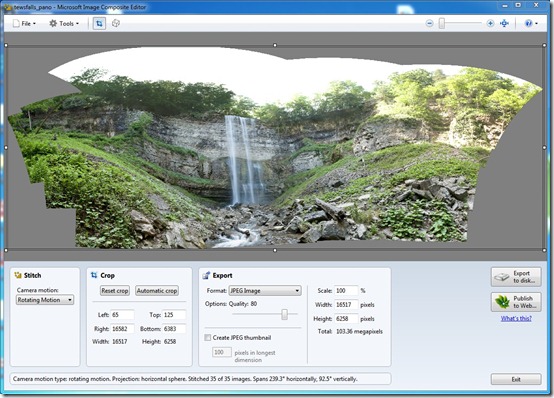
Now that these programs are installed open Microsoft Image Composite Editor (from Start Menu -> All Programs -> Microsoft ICE -> Microsoft ICE). Now open Windows Explorer and go to the folder your images are contained in. Click on the first image and hold Shift and then click on the last image in the series. Now Drag and Drop the entire set of images into the Gray area of Microsoft Image Composite Editor. The program will do all the work and you’ll end up with an image like so:

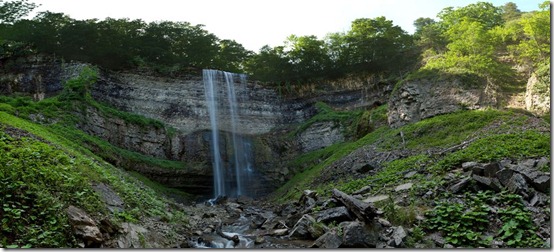
If you want to save the image as a JPEG so you can open it with any image software, set the crop lines and click the button on the bottom right “Export to disk”. See below for the image I did of Tews Falls.

This is only a 180 degree panorama, but viewing it in this form on the web doesn’t give you the same effect as Photosynth. To publish to Photosynth, just click the “Publish to Web…” button just below and follow the prompts. This will launch Microsoft Photosynth, ask you to enter your Windows Live credentials, set your title, caption, and choose a thumbnail image. Also once it is uploaded you can log into Photosynth and Geotag the image and have it viewable from Bing Maps.
Below is my example of Tews Falls (I did not do the full 360 image in this one, but will have to make another trip back just to do this).
Here are some tips I’ve learned for shooting waterfalls and 360 panoramic images:
Shoot your panorama from eye level. You want the person to feel like they are in the photo. If you notice my example of Sherman falls (first Photosynth in post), I shot from a crouched position which makes it feel like you’re looking from the eyes of dog.
Use a higher aperture mode. F11 or higher works nicely to keep everything in focus. This is only for shooting when you want to keep both the foreground and background in focus.
Don’t shoot at mid day with no clouds in the sky. Your photos will probably be overexposed and you will lose a lot of detail. Try shooting in the golden hours (sunrise/sunset). To shoot a blurred stream effect you need to need to have a slow shutter speed. Ideally, I would have been shooting at an even slower shutter speed to get an even better blurred stream effect, but this would have required shooting in better lighting conditions. You can also purchase a Neutral Density filter for your camera, which reduces the light coming into the lens which a lot of people recommend for that blurred stream effect.
Shoot in raw mode if possible. This will allow you to fix up your photo later without reducing the quality.
Have a goal. If you’re having trouble getting motivated to lug around your shiny new DSLR, set a photography target. For me, using waterfalls as my end goal is motivation to lug all my gear during a hike. It helps to have a goal.
Bring some waterproof protection for the camera. The waterfall produces mist and you may need to try to keep the camera body dry. Bring something lens-safe to wipe the lens with.
Bring waterproof shoes. Sometimes the best angle is on the other side of the river…or directly in the middle of it.
While I’m sure most people already know this, I also learned ‘Panorama’ is a noun and ‘Panoramic’ is the adjective… After looking this up I went back and checked through this tutorial and I was pretty much using them backwards. This blogging stuff ain’t easy!
Hopefully this tutorial will get your feet wet. From there you can consider how far you want to take your panoramic images. If you have some of your own photography tips I would love to hear them!
Now back to the regularly scheduled posts.


Super helpful tutorial. Thank you, Eric.
Def have to book mark this and read it a few more times. So technical! …but I love it! Thanks Eric!! Such useful info and neatly typed up for us :0)
Wow! The end result looks so cool- thanks for sharing, Eric :)
This is a great post, Eric! =D So much detail! Thank you very much. =)
This is quite the tutorial and one day it could come in handy!
Thank you for the great information (and gorgeous pictures), Eric.
I was curious so I looked up your first post here and it really made me laugh.
Welcome back to OSG, Eric! Please don’t let two more years go by before you say hello to all of us readers!
:) Thanks Catherine, that will make his day!
Whoa, you guys are an unbeatable duo! Between recipes and photography tips, I’m set to take on the world ;)
Hey everyone, thanks so much for the comments. I’m glad you liked the post. I will be doing another HDR tutorial post in the future.
This is so helpful – thank you. I’ll look forward to the next HDR tutorial too! I really need reminders to get off my intelligent auto setting and into the manual modes, and this has definitely served that purpose :)
Hi Angela and wonderful readers!
I just want to say how much I love the OSG comment boards, Im not sure if negative comments just don’t make it up or if they just aren’t written in the first place but it is so fun and energizing to see such a wonderful encouraging group of people who love the blog and appreciate its ‘awesomeness’ :) just like I do, you guys rock!
Cheers to positivity and healthy living!
Naomi
This is a really cool post, Eric! Even though I have a mac and don’t have a professional camera (yet!) I thought it was really interesting and the pictures turned out great!
Wow, what a post!! So much work put into this Eric, well done.
Well, I’m glad that as a Mac user I’m not at a total loss ;) I look forward to more tips!
he’s not being fully honest…he has an ipad! The secret is out Eric. ;)
I have a fancy new camera and I’m still trying to figure out how to use it. I’ve always wondered how to do panoramic shots! Thanks!
Thanks so much for taking time out of your life to be a tutor for all of us Eric. I will definitely be implementing your suggestions in my Canada Day photos.
Wow, this is an excellent post. In-depth, concise, clear and very well explained. Thank you!
so cool! thanks for sharing!
Awesome, thanks Eric! And I love that y’all are PC people
Thanks for posting! I have a digital slr that I need to learn to do more with!
I just started doing photography and this is great that I’ve come across to this post of yours. Will definitely gonna try and practice this. Will love to capture beautiful sceneries in a panoramic view. Thanks for this post, Eric!