

I unofficially deem this Sugar Pumpkin Week here on Oh She Glows. No wait, make that officially!
I’m not talking canned pumpkin this week.
I’m certainly not talking large carving pumpkins this week.
But sweet, cute-as-a-button sugar pumpkins. The ones that started showing up quite early in my grocery store at the end of August (thank you Organic Garage!). Often just 2-4 pounds, sugar pumpkins (also known as pie pumpkins or pumpkin pie squash) are sweeter than larger carving pumpkins, making them perfect for all of your favourite pumpkin dishes. Their flesh is also firmer and less stringy than carving pumpkins.
My goals for this week are to show you how simple it is to prepare a sugar pumpkin whether its roasting, puréeing, toasting the seeds, or making recipes. It’s really much easier and faster than you might think (at least it was for me!) and it’s nice to take a break from canned pumpkin once in a while. The flavour of a fresh roasted pumpkin is quite different from the canned variety; it’s a bit earthier and nuttier, not to mention so buttery when roasted. A side-by-side taste comparison of canned pumpkin versus freshly roasted pumpkin will make your head explode. It’s definitely worth the extra work now and then.
I hope my photos will inspire you to try it out for yourself if you haven’t already done so. For the pumpkin pros out there, feel free to share you favourite tips and recipes in the comments. If you can’t find a pie pumpkin in your area yet, feel free to try this with butternut squash. The roasting process is pretty much the same and the outcome is just as delicious.
All set?

Roasting 101:
1. Preheat the oven to 350F and grab small 2-3 pound sugar pumpkin(s). I like to roast a couple 2-lb. pumpkins at the same time. Remember – we’re not looking for the huge carving pumpkins here.
First things first, sharpen your knife! You don’t want to use a dull knife on any squash…or food for that matter.
2. Slice the stem off before slicing in half so you don’t have to slice through the stem.

I forgot to in this photo below, but it’s much easier when you remove the top! Some people prefer to slice off both ends and then peel the entire pumpkin before roasting, but I find it easier to peel the skin after roasting – much like with roasted beets.
3. Slice in half.


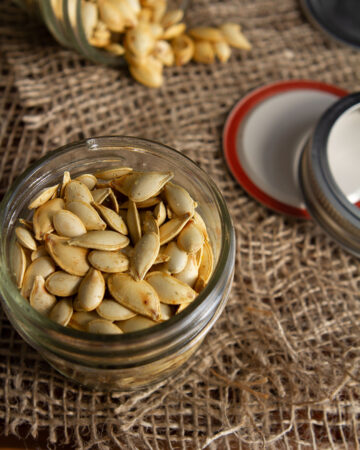
4. With a sharp-edged spoon (I use a metal tablespoon with a sharp edge or you can use a metal ice cream scoop), scoop out the seeds & guts. Make sure you clean & save the seeds for roasting. I’ll show you my favourite way to roast the seeds coming up in a future post. Whatever you do, do not throw them out!

5. Brush inside with oil (optional, but I like to) and place face down on baking sheet lined with parchment paper. I roasted two 1.9-lb. sugar pumpkins. They are so tiny and could all fit on my roasting pan!

6. Roast at 350F for about 45-50 minutes. The exact time will vary depending on the size of the pumpkin(s) and you may need more time. The skin will be slightly darker and you should be able to poke a fork quite easily through (see image below).
Here is my pumpkin ready to come out of the oven. As you can see, the skin is a deep orange, slightly wrinkled, and my fork could easily slide through.

6b) I could not resist sticking my fork in and tasting my first (very hot) bite. YUM!! If you want to stop here, just give it a good sprinkling of Herbamare and freshly ground black pepper. Then dig in!

7. Let the pumpkin cool for 10 minutes before handling. Grab a large spoon and peel away the very thin skin. It comes off almost effortlessly. At this point, you can use the flesh in all kinds of dishes – soups, casseroles, risotto, pies, etc.
Steamy!

Into the compost goes the skin. Unless you’re Eric, you might put it in a smoothie…(I joke, I joke).

Today, I decided to make pumpkin puree for a recipe I was planning (hint #1!).
8. If making a puree: Place the pumpkin flesh into the blender and blend away until super smooth. I used my tamper stick on the Vitamix to push all the pumpkin down until it got going. Let it go for a good minute or two – you don’t want any clumps left.
The result was out of this world – so smooth and buttery!

3.8 pounds of pumpkin (weighed before roasting) made 4-4.5 cups of pumpkin puree. Not too shabby at all! As a rule of thumb, 1 small sugar pumpkin should make enough puree to equal one 15-oz. can.
At this point you can drain the pureed pumpkin in a cheesecloth to remove excess water or you can use it as is. I didn’t bother draining it because I knew I’d be cooking it down for the recipe (hint #2!).
Whatever you do – be sure to save the seeds for roasting.
Coming up – the recipe I used my pumpkin puree for and my favourite way to roast pumpkin seeds.
What’s your favourite way to enjoy fresh pumpkin?


Hey Angela,
I am jealous because I am reading this after just baking 2 loaves of pumpkin bread using canned pumpkin. It was an emergency craving! Next time I will def try your method and maybe try freezing some…
On an unrelated note, I was at a Costco today in Kitchener and they were demoing Vitamix’s. I was swooning over them and listening to the saleslady as she made lots of veg and vegan samples–that I could actually try. She was talking to the crowd about recipes and said there are lots of great food blogs that use them daily. She asked me if I’d ever heard of Oh She Glows! I said ‘why of course! I follow her every post!’ hehe. So just thought I ‘d let you know you got some good advertising today!!!
I left a comment yesterday that appeared to disappear into the interweb-nothingness…
Here in Australia we don’t get pumpkin in a can, it’s always do-it-yourself :)
If I want pumpkin puree I would slice then cut the skin off the pumpkin once it’s in smaller more manageable pieces, then just steam or boil, drain and puree – it’s quicker than roasting, and can be kept in small portions in the freezer quite well.
For roasting, I also slice into chunks first (and cut the skin off if the pieces are destined for being mixed into something like risotto), coat with olive oil and chopped herbs (rosemary or marjoram are good, or nutmeg – again, depends on the end destination), and roast so that the individual pieces each get a nice roasty edge. Delish!
P.S. I love my “P alliteration” risotto – pieces of pumpkin roasted with flat-leaf parsley, and green peas mixed in to risotto, served with a handful of pine-nuts and some “parmesan” on top, and an extra piece of parsley as garnish to make it look fancy!
Can’t wait to try this! Can you freeze it by any chance? How long do you think it can stay?
I don’t know if anyone else has mentioned this (I just don’t have time to read through all the comments right now), but I roast my pie pumpkins whole. Just wash it, prick it with fork, and stick the whole thing in the oven. When it’s done, I slice it open, remove the strings and seeds, and just spoon out the flesh!
I was wondering if that was an option! Glad to know it works. Is it easier to remove the “guts” doing it that way too? How long do you roast it for?
This is perfect! I’ve been dreaming about the pumpkin curry recipe in The Vegan Table, but I wanted to do it with freshly pureed pumpkin. Thanks so much!!!
what if i dont have an oven :(? how could i cook this ?? steaming it ? :)
PUMPKIN SKINS RECIPE….
Begin with a preheated oven set at 325 degrees F
One medium size pumpkin (baking kind or even the ornamental jack-o-lantern kind which is what I use)
2 Tbls butter
3 Tbls salt
1/4 cup molasses or honey
2 Tbls cinnamon
1 tsp each of nutmeg, ginger, cloves
1/2 tbs cayenne (optional)
Halve the pumpkin cutting off the stem, then scoop out the seeds. (Save these seeds for roasting later.) Place the pumpkin shell-side-up on a baking sheet with a few spoonfuls of water. Bake at 325 for an hour, checking to make sure the top on the shell is not burning on the upper electrical element. Remove the shell and scrape out most but not all of the cooked pumpkin to use in muffins, pies and such. Leave about a 1/4 to 12 inch of pumpkin meat on the skin. Slice the skin into strips about 1 inch wide from the top to bottom along the natural lines in shell. Lay them flat, and then spread the butter and spices evenly.
Return the strips to the oven for 2 hours at a very low baking temperature of 150. Remove and enjoy them hot or store in the refrigerator and use as a side dish or appetizer
Oh and I use almond butter for the skins and its really yummy!
thanks for the recipe. Tried it yesterday and I loved it. Now i only need to figure out what to do with it ;) I guess I’ll try your pumpkin butter
i must have gotten the wrong kind of pumpkin :( its almost 3 lbs and thought it was a sugar pumpkin, but me or my boyfriend can NOT cut through it. oh well, next week at the farmers market i will ask for a sugar pumpkin specifically.
aw I’m sorry to hear that! They can be tricky. I hope you have better luck next time :)
So I was thinking this morning that if you, Angela, were to create a pumpkin spice latte, I would melt! I don’t care what the agonizing process and preparations would have to be, but I can’t handle spending so much on pumpkin spice soy lattes… Oh my god, and with coconut whip cream… I’m so glad there are other pumpkin-obsessed people out there!
yay! i absolutely will be using this tutorial! thank you.
Thanks for the tutorial!
I can’t get canned pumpkin here in the UK at a good price.
I may have to try doing it myself now!
I am curiuos if you can use the puree to turn in to a pumpkin Powder or a pumpkin flour rather? And how would you go about doing this, it the process different?
Thank you!
kathleen
I agree with one of your commentators that it is a great tutorial. I had tasted the pumpkin butter from Trader’s Joe which gives me an idea about the ingredients but not the complete recipe. So, your tutorial is a good tip.
Pumpkin bread I used my pupree for. But looking for a soup recipe for pumpkin.
Great way to show how easy it is to roast these little guffers! You are always makin’ things easier for people. Nice work and thanks for this!
My husband and I process quite a few pumpkins every year after Halloween. The local pumpkin patch gives us all we want every November 1st. A lot of them go to the cows next door, but about 15-20 big pumpkins end up on my porch to stare at me every time I pass by. When we get around to processing them, it’s an all day long ordeal that is completely worth it to have pumpkin puree year round. My husband chops the pumpkins up with a meat cleaver then scrapes out the seeds and stringy stuff. He then boils the pieces in our turkey cooker. All this is done outside which makes me very happy. When the pumpkin is soft, he drains the pot and brings me the bounty. I scrape the flesh from the skins, blend it in my food processer until smooth, and store it in freezer bags until I’m ready to use it. We love pumpkin soup, muffins, bread, smoothies, etc. My next endeavor is trying my hand at pumpkin butter. Wish me luck.
This is a great tutorial!! Wonderful pictures too (I have got to learn how to take better pictures). I just posted a recipe tutorial for Homemade Pumpkin Butter, and linked this. Thanks you for taking the time to do this!
Great instructions–my pumpkin is in the oven right now!
Beauty tip: While the pumpkin is baking, you can rub some raw pumpkin juice on your face to do a homemade pumpkin enzyme mask! Leave on 15ish minutes (or while you’re cleaning the seeds) and your skin will be smoother and glow more, promise. It’s a great way to use ALL the pumpkin parts. :)
Ah that’s so cool! I will have to try it.