

I unofficially deem this Sugar Pumpkin Week here on Oh She Glows. No wait, make that officially!
I’m not talking canned pumpkin this week.
I’m certainly not talking large carving pumpkins this week.
But sweet, cute-as-a-button sugar pumpkins. The ones that started showing up quite early in my grocery store at the end of August (thank you Organic Garage!). Often just 2-4 pounds, sugar pumpkins (also known as pie pumpkins or pumpkin pie squash) are sweeter than larger carving pumpkins, making them perfect for all of your favourite pumpkin dishes. Their flesh is also firmer and less stringy than carving pumpkins.
My goals for this week are to show you how simple it is to prepare a sugar pumpkin whether its roasting, puréeing, toasting the seeds, or making recipes. It’s really much easier and faster than you might think (at least it was for me!) and it’s nice to take a break from canned pumpkin once in a while. The flavour of a fresh roasted pumpkin is quite different from the canned variety; it’s a bit earthier and nuttier, not to mention so buttery when roasted. A side-by-side taste comparison of canned pumpkin versus freshly roasted pumpkin will make your head explode. It’s definitely worth the extra work now and then.
I hope my photos will inspire you to try it out for yourself if you haven’t already done so. For the pumpkin pros out there, feel free to share you favourite tips and recipes in the comments. If you can’t find a pie pumpkin in your area yet, feel free to try this with butternut squash. The roasting process is pretty much the same and the outcome is just as delicious.
All set?

Roasting 101:
1. Preheat the oven to 350F and grab small 2-3 pound sugar pumpkin(s). I like to roast a couple 2-lb. pumpkins at the same time. Remember – we’re not looking for the huge carving pumpkins here.
First things first, sharpen your knife! You don’t want to use a dull knife on any squash…or food for that matter.
2. Slice the stem off before slicing in half so you don’t have to slice through the stem.

I forgot to in this photo below, but it’s much easier when you remove the top! Some people prefer to slice off both ends and then peel the entire pumpkin before roasting, but I find it easier to peel the skin after roasting – much like with roasted beets.
3. Slice in half.


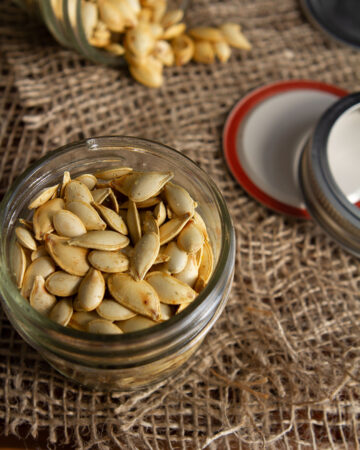
4. With a sharp-edged spoon (I use a metal tablespoon with a sharp edge or you can use a metal ice cream scoop), scoop out the seeds & guts. Make sure you clean & save the seeds for roasting. I’ll show you my favourite way to roast the seeds coming up in a future post. Whatever you do, do not throw them out!

5. Brush inside with oil (optional, but I like to) and place face down on baking sheet lined with parchment paper. I roasted two 1.9-lb. sugar pumpkins. They are so tiny and could all fit on my roasting pan!

6. Roast at 350F for about 45-50 minutes. The exact time will vary depending on the size of the pumpkin(s) and you may need more time. The skin will be slightly darker and you should be able to poke a fork quite easily through (see image below).
Here is my pumpkin ready to come out of the oven. As you can see, the skin is a deep orange, slightly wrinkled, and my fork could easily slide through.

6b) I could not resist sticking my fork in and tasting my first (very hot) bite. YUM!! If you want to stop here, just give it a good sprinkling of Herbamare and freshly ground black pepper. Then dig in!

7. Let the pumpkin cool for 10 minutes before handling. Grab a large spoon and peel away the very thin skin. It comes off almost effortlessly. At this point, you can use the flesh in all kinds of dishes – soups, casseroles, risotto, pies, etc.
Steamy!

Into the compost goes the skin. Unless you’re Eric, you might put it in a smoothie…(I joke, I joke).

Today, I decided to make pumpkin puree for a recipe I was planning (hint #1!).
8. If making a puree: Place the pumpkin flesh into the blender and blend away until super smooth. I used my tamper stick on the Vitamix to push all the pumpkin down until it got going. Let it go for a good minute or two – you don’t want any clumps left.
The result was out of this world – so smooth and buttery!

3.8 pounds of pumpkin (weighed before roasting) made 4-4.5 cups of pumpkin puree. Not too shabby at all! As a rule of thumb, 1 small sugar pumpkin should make enough puree to equal one 15-oz. can.
At this point you can drain the pureed pumpkin in a cheesecloth to remove excess water or you can use it as is. I didn’t bother draining it because I knew I’d be cooking it down for the recipe (hint #2!).
Whatever you do – be sure to save the seeds for roasting.
Coming up – the recipe I used my pumpkin puree for and my favourite way to roast pumpkin seeds.
What’s your favourite way to enjoy fresh pumpkin?


Great tutorial Ange! I saw the small sugar pumpkins this weekend at Whole Foods and was so tempted to buy one. I love scooping out the flesh and using them as a bowl for chili. I cook the chilli on the stove as normal, and roast the pumpkin (with the top and stem sliced off and hollowed out) while that’s happening. Then I fill the pumpkin with chili like a bowl, roast it a few more mins, then eat. It’s so, so good!!
Still waiting and hoping these little gems arrive in Kansas! We were hit pretty hard with the drought this year, but you never know! I adore sugar pumpkins. They are the best for soups, purees, and anything involving pumpkin out of the can. Thanks for the tutorial:)
Thanks for the tutorial! I definitely want to try this because I don’t think I’ve ever tried real fresh pumpkin before. I love the canned kind though! But actually according to owner of the farm where I worked last summer, a lot of the time canned pumpkin isn’t even real pumpkin – it’s actually made from some kind of squash!
I love your photos in this post! The dark black/brown background contrasts so well with the bright pumpkins. I have too many favorite ways to enjoy pumpkin but your smoothie is on my list to try!
Where are you finding these pumpkins?? I know you’re near me…and the burlington mall market is seriously lacking in squash of any kinds so far….Can you help a girl out who is desperate for pumpkins in her brekkie (and butternut squash mac n cheeze)?
My absolutely favoritest favorite way to enjoy a sugar pumpkin is stuffed with apples, walnuts, cinnamon and a tiny bit of butter and baked. When it is done baking, you scoop the stuffing and meat of the pumpkin out and mash it all together. It’s sweet from the apples, crunchy from the nuts and buttery smooth.
sounds incredible!
I love roasting pumpkins at home! Don’t forget that those larger carving pumpkins are food too – I always roast my carving pumpkins. I get all soap boxey about this every year because I hate seeing so much food go to waste, and I always try to ‘rescue’ as many carving pumpkins as I can get my hands on. I roast ’em, puree the flesh, and freeze it in 1 cup portions for using in baking and smoothies throughout the year.
Great tutorial! I always make my own pumpkin puree since you cannot buy it in stores here in Germany. But I actually always cooked it up portion sized – just as much as I needed and never tried to bake the whole thing. I am afraid that it spoils to fast. Do you know how long you can keep pumpkin puree in the fridge?
Not sure about the fridge, but have you tried freezing it? I don’t freeze purée, but I cook it like Angela says then cut off the skin and cube the pumpkin and freeze the cubes in bags after I suck the air out with a straw. That’s my tip for vacuum-sealing your freezer bags so your produce doesn’t get all icy! I freeze in one-cup servings in each bag so I just take out one bag or whatever I need and let it come to room temp before pureeing. I’m sure you can freeze purée too, that’s just what I do since sometimes I cook with chunks too. Try it!!
Thanks for the hint :) gonna try this next time!
I made pumpkin pie this way last year. Never from a can again!!
That is so simple. Thanks for the recipe. :)
Thanks for the tutorial!
Julie and I are so excited that pumpkin season is here! We usually use the canned stuff, because we’ve had trouble finding sugar pumpkins in our local grocery store in the past, but this post has given us renewed motivation to track them down!
Yummm! Nothing welcomes autumn like a good pumpkin dish! :) Thanks for the tutorial, we don’t get canned pumpkin over here so this will be a good way to make all the dishes that require pumpkin :)
This came at a great time as I have about 2 dozen sugar pumpkins in the garden ready for harvest! Thanks. =)
I love this post. It is so simple and here I have been so intimated that I never even looked into it before! Thank you for posting this, Angela and I can’t wait to see your next recipe using the pumpkin puree! :-)
Wow- that puree looks so beautiful and buttery- I could eat it up with a spoon!
And THAT is probably my favorite way to enjoy fresh pumpkin. :)
wow. It looks easy. I would never have thought to make my own, but it’s so much healthier than the canned versions. Who knows what chemicals are lurking in the cans anymore!!!
What a helful post! Thanks for including all the photos. I will have to try this out once the weather cools down.
These photos are really attractive — the dark background highlights the pumpkin (without being to “spooky”). I like to add pumpkin puree to chilis — just a 1/2 cup seems to add a real depth to the flavors.
Sugar pumpkin week?! I’m alll in for that one. My yard is packed with sugar pumpkins right now… my plants went wild!