


Making a pie from scratch has to be one of the most feared tasks of all time. I would say it ranks right up there with bread baking, public speaking, and drinking something green. I always had this expectation that everything had to go perfectly for the pie to turn out. If my dough ripped while putting it in the dish I would just about have a heart attack.

These days I’m more relaxed when tackling a pie crust. That comes from practice (and a bit of bourbon-spiked apple cider doesn’t hurt the process either!). I’ve learned that each pie crust tends to turn out a bit differently. Some of them I like to burn to hell, while others I’m more mindful of the timer function. Anyway, when a pie crust doesn’t turn out as expected, you call it a “rustic” pie and everyone thinks you are a culinary genius. bahaha… fools!
burn the crust? It’s rustic.
the crust crumbles to pieces? rustic
Pie explodes when you cut it? yup, rustic
you find your dog licking the pie before dinner? it’s rustic with a hint of dog breath
No biggie.
If you want a sure way to loathe making pie, then my advice is to expect every outcome to be perfect. If you want to have fun with the process and get a bit better with practice, then stick around for pie crust class!

Check out my pages of scribbled notes and recipes galore over the past couple months. Why must I insist on writing my recipes in chicken scratch and losing them all over the house? I am truly my own worst enemy.

When it was all over, I think I said the words “never again” and “if I see another pumpkin pie I may hurl”.
With that being said, I think you will love these recipes!
I tested 3 kinds of crusts:
Classic flaky pie crust:

My rustic spelt pie crust from 2009:

A gluten-free pie crust made from pecans, GF oats, etc.:

I also tested 3 kinds of pumpkin pie fillings:
- Classic pumpkin pie filling using arrowroot or cornstarch powder
- Cashew cream pumpkin pie filling for extra creaminess
- Coconut flour pumpkin pie filling to thicken filling
The results:
Favourite pie crust winner –> Sweet & Salty Spiced Pecan Crust (gluten-free, all-natural, amazing flavour, paired perfectly with the filling!!)
Runner up: Rustic Spelt Crust (super easy to prep, no chilling dough, healthier flour)
Least favourite pie crust: Classic flaky (the most curb crust appeal, but lacking flavour, greasy, and very labour intensive/fussy)

Favouite pie filling winner: Classic (the most classic tasting pie filling whisked together in just 5 mins)
Least favourite pie fillings: 1) Coconut flour (it dried out the filling a bit too much although it set much quicker) & 2) cashew cream (I could detect the cashew taste slightly, fussy prep with cashews, and it took longer to set)
First up, I’ll talk about the classic pie crust:

Classic Pie Crust Ingredients (least favourite crust):
While this has the most traditional flaky crust and appearance, it was not my favourite tasting and greasy on the bottom! Make at own risk!
- 3/4 cup Earth Balance (I used 1 shortening stick and 1/4 cup soy-free Earth Balance), frozen
- 2 cups all-purpose flour
- 1/2 tsp kosher salt
- 1 tbsp sugar
- 7-8 tbsp ice water
I followed the directions to a tee for making a classic pie crust here. I tested this crust using a few different combinations of Earth Balance and was just never impressed with the outcome. The top crust baked well, but the bottom was always quite greasy and bland.
It did make a gorgeous lattice crust though! I also paired it with a pecan praline on top of the filling.


Pretty, but lacking in the taste department.

Next up, the hearty spelt crust and classic filling!


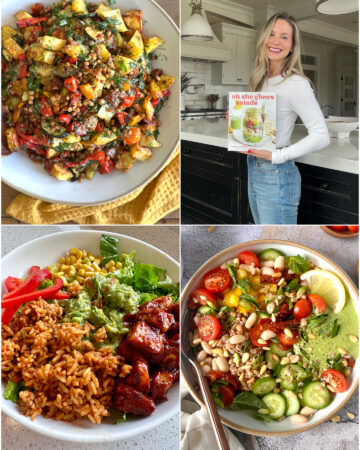
Featuring all new, protein-packed salads, hearty toppers, flavour boosters, and dressings you'll want to drink, my new cookbook will transform the way you think about salads. Oh, and be sure to flip to the back for a surprise dessert chapter!

Vegan Pumpkin Pie with Rustic Spelt Crust

Yield
8-10
Prep time
Cook time
Chill time
1 hour
Total time
While this spelt crust is anything but classic and flaky it’s one of my favourites simply because it’s easy, there’s no chilling required, and it’s healthier than than most. The crust is quite dense and firm with a hearty, lightly sweet flavour. The filling is quite traditional, however not too sweet, but just right. Serve with non-dairy ice cream or whipped cream and a sprinkle of cinnamon and nutmeg.
Ingredients
For the crust:
- 1 cup whole grain spelt flour
- 1 cup unbleached all-purpose flour
- 1/4 cup dry sugar (Natural cane sugar, brown sugar, or Sucanat)
- 2 tbsp ground flax seed
- 1 tsp ground cinnamon
- 1/4 tsp kosher salt
- 1/2 cup almond milk
- 1/2 cup coconut oil, melted OR Earth Balance, melted
For the pumpkin filling:
- 2 1/4 cups canned pumpkin (not pumpkin pie filling)
- 1/2 cup natural cane sugar or brown sugar
- 1/4 cup full-fat coconut cream (or almond milk), softened
- 1 tbsp Earth Balance, softened
- 1/4 cup pure maple syrup
- 3 tbsp arrowroot powder (or cornstarch)
- 2 tsp vanilla extract
- 2 tsp cinnamon
- 1/2 tsp ground ginger
- 1/2 tsp nutmeg
- pinch of ground cloves
Directions
- Crust (1): Preheat oven to 425°F and grab 9-inch pie dish. In a large bowl or stand mixer, mix dry crust ingredients. Pour in milk and melted coconut oil. With an electric mixer, mix just until the dough forms into a few lumps. Do not overmix. The dough should be moist, but not too sticky. If it’s too sticky work in a tiny bit of flour when rolling.
- Crust (2): On a non-stick mat or lightly floured surface, roll out dough until it’s a couple inches wider than the pie dish. Place pie dish on top of dough and trim the edges leaving 1-inch around the edge. Gently roll the dough onto the rolling pin and then unroll over top of dish or just flip the baking mat over with the dish on top. Tuck the edges of the dough under and then crimp/flute the edge using your fingers (see photos below). Poke 12 fork holes into base and pre-bake the crust for 7 minutes at 425°F, no pie weights required. Roll out remaining dough and cut shapes with cookie cutters. Cover dough shapes with plastic wrap.
- Filling: In a small bowl or mug, whisk together the maple syrup and arrowroot powder (or cornstarch). In a large bowl, whisk together all ingredients, adjusting spices to taste.
- To bake: Scoop the filling into crust and smooth. Add cut-outs on top. Bake for 45 mins at 350F. Remove and cover crust edges with tinfoil or crust shield. Bake for another 15 mins. Place on cooling rack for 1 hour. Transfer to fridge to set for a minimum of 3 hours or overnight. (this is very important!)
Tip:
Tips and tricks: 1) The dough should NOT be chilled, but rolled immediately. 2) Using full-fat coconut cream (from the top of the can) yields in a richer and creamier filling (I couldn’t detect the coconut taste much), but feel free to use almond milk. 3) The pie must set in the fridge for a minimum of 3 hours before serving. The longer it chills for, the more it firms up.

The beauty of this spelt crust is that you don’t chill the dough! It’s hands down the quickest pie crust I have made.
(note: these pictures are from my classic crust dough and not the spelt):
Tuck under the overhanging dough:


Now crimp/flute your pie edge using your fingers. Work your way all around the edge.

Prick crust with a fork and pre-bake for 7 minutes at 425F. Cool for 10 mins. Add filling and smooth.


Add your cut-out shapes on top (I cut 4 big leaves, 12 small leaves, and 5 balls)


[These photos are of the actual spelt crust now!]
Before baking the spelt crust:

Bake at 350F for 45 minutes, remove and cover crust with a shield or tin foil, and bake for another 15 minutes at 350F. Cool on rack for 1 hour and transfer to fridge for a minimum of 3 hours to set. <—very important step!

Does anyone know the best method for covering the edges of a pie crust? I find tin foil so annoying to use…it always falls off! Any good crust shields out there?

While I enjoyed the spelt crust, my favourite crust award goes to the gluten-free Sweet & Salty Pecan crust! It wins in the flavour department by a landside and it’s worth every single calorie.

Sweet & Salty Spiced Pecan Crust (Gluten-free)
Absolutely worth every calorie and then some! It’s a bit sweet, buttery, lightly spiced with cinnamon, and enhanced with a bit of salt to bring out the flavours. This crust goes so nicely with the pumpkin pie filling! This crust is very sensitive to changes, so I caution against changing things in the recipe.
Inspired by Manifest Vegan.
Ingredients:
- 1 cup GF certified rolled oats, processed into a fine flour OR 1 cup GF oat flour
- 2 cups raw pecans
- 2 tbsp sugar
- 3 tbsp ground flax
- 1 tsp ground cinnamon
- 1/2 tsp kosher salt
- 1/4 cup brown rice syrup (acts as the binder, honey may work if you prefer that)
- 1 tbsp coconut oil or Earth Balance
The pecans need to be ground very finely until they release their oils and start sticking to the side of the machine (this took me 35 secs exactly in my processor, fyi). You should be able to form a ball with the pecans. If you don’t process the pecans enough the crust will be too dry. With that being said, you don’t want to make pecan butter either!


After mixing all the ingredients, the dough should be a bit sticky like this:

You should be able to form a big ball with it. If it’s too dry, add a touch more melted Earth Balance, a teaspoon at a time.
Crumble it into a greased pie dish:

Press down and outward to form the crust (press firmly!) and pre-bake for 10-12 mins at 350F. Cool for 10 mins before scooping in filling and baking. Make sure you let the pie chill for at least a few hours in the fridge before carefully slicing with a sharp knife.


Ding, ding, ding we have a winner!

This pie crust also makes the house smell divine. Mmm.

[source]
If you made it this far, bless your soul. That was one long post!
Here’s to a stress-free pie season!


I love love love the top of the pie with leaves and a flower. Very cute! It looks delicious, and I don’t even like pumpkin pie! :P
Angela,
Would it be possible to make these in individial 4″ tart pans??
I want to up the cute factor for my First Vegan Thanksgiving.
Thanks for the divine recipes you always provide.
:)
Heather
Gosh golly, I don’t think I’ve ever seen as thorough a post about pie! You’ve given so many options– thank you!
I’m off to eat one that I’m sure will be largely inferior to all yours at a work Thanksgiving :)
OMG! You’re so talented! I love you and your blog sooooo much! Your writing is so light and fun! And your pictures… Oh my! Breathtaking! Thank you for bringing so many smiles to my life. God bless you <3
My older sis claimed dibs on the pumpkin pie making this year for our family T-Day (I’m on cheesecake duty). . . . but. . . I could make this for the Hubby’s family T-day. Though everyone makes faces and grumble whenever I mention it’s vegan/gluten free. Does this pie win over non vegans and gluten lovers alike? Or should I wait until after they had some to tell them what it is? Lol.
Oh my gosh, thank you so much for this gluten free crust recipe- I am definitely making it!!!! :)
Another great and quick pie crust-crumbled cookies mixed with a lil earth balance!
I love how organized and ordered your posts are – they totally appeal to the organizational freak within me :). And yay that your gluten-free crust was the best one, I always try to avoid eating gluten if I can – though I’m not sensitive – and the gluten-free buy-your-own pie crusts are so expensive!
Awesome, this is perfect timing, I was just looking for pumpkin pie recipes my daughter and I could bake together, and I was hoping to find a vegan one!
Wow — I now know what I’m making for Christmas dinner…Or dessert rather, if I can wait.
hahaha send ’em all throughout the world! That’s alotttttttta pies! You worked hard, girl~ :D And how funny! Last night I made a “pumpkin pie bar” that turned out vegan and uses almond meal as crust base. It was delicious and miraculously vegan since mid-way of making it, I realized that I ran out of eggs! :P
Ohhh!! And I loooove that lattice crust!! it looks so perfect it looks fake :P
You’ve inspired me! I think I’ll have to make the pecan crust one over the holidays!
Thanks!!
Fantastic post, Angela! Got me drooling yet again! Kiss from England.xo http://hannahalehandra.blogspot.com/
I am truly impressed with the amount of work you did Angela! And I’m so glad the gluten-free crust turned out so well, because it looks delicious! It totally inspires me to do some experimenting in the kitchen!
Haha, your perspective on ‘rustic’ is the same as mine :) Once again, thank you for doing all the difficult work, Angela! These pies look so delish, I can’t wait to try one out this week. Hope you recover your desire for pie pretty soon!
Haha – love the use of “rustic” – I like to toss in “authentic” and “old fashioned” to cover slightly tragic recipe flaws as well :)
Looking forward to trying the pecan crust!
Wow… pie. I love that your favorite was the gluten-free crust! That’s awesome!!
I SO can’t wait to try these! I may do the gluten-free one for Thursday and the others for Christmas! Thank you for being the one to experiment so we don’t have to!
Thanks for the step-by-step pictures for the lattice. I have always wondered how that was done. lol I have a simple ring that I use for part of the baking time and it works well. I think it was a Dollar Store purchase.